Welcome to Whim Wham's Craft Blog!

I love to craft, sew, knit, crochet, needle felt...ect. Unfortunately, no one around me shares this passion. So, I am branching out into cyber world, hoping to connect with a few crazy...I mean crafty people like me. Enjoy! :)


Friday, February 26, 2010

We Made Paper Mache Jewlery with Inkjet Transfers Today!

So I saw a tweet today from SisterDiane linking to a site with a tutorial on making paper mache pendants.  The site is Make Paper Crafts.  It has lots of cool projects on how to make jewelry and other things, all out of paper.
Well, after reading the blog, I went into Cora's room and she was cutting paper into tiny pieces....so I thought, she's already got it started.  Let's make some paper mache jewelry!

First, I cut out some shapes from a thick cardstock.  We made a rectangle, circle, and heart.  Then we covered the shapes with watered down glue, and all of the bits of paper she had cut up.  Once they were dry, we painted them with acrylic paints.
The next part was the cool discovery for the day.  We wanted to put inkjet printed pictures on them. Transfers are cool, but inkjet transfers can be difficult.  I have heard of doing inkjet transfers with transparency film before, but I had none on hand, so I had to improvise.  For some crazy reason, I thought if I could adhere cling wrap to paper, I could run it through the printer.  So, that's exactly what I did.
I took a sheet of paper, and put a piece of cling wrap on top of it (both the same size).  Then on top of that, I put a scrap piece of fabric and ironed (on a low setting- poly/rayon) for a couple seconds.  The cling wrap adheres to the paper, but not the fabric.  I ironed it until all of the cling wrap was melted down.  It does shrink towards the middle, so I left the fabric on for a couple seconds before removing, so the paper doesn't distort before it cools.  Then I ran it through the printer (printing on the cling wrap side of course).  You have to adjust the picture placement, to make sure it prints toward the middle of the page on the cling wrap part, and be sure to mirror images for text.
There are 2 ways to use the transfer now, with the paper attached or you can peel the cling wrap off (yes, believe it or not, it peels off).  I found it difficult to use when it was peeled off, because it wants to roll onto itself, so I left it attached to the paper.  I just wanted the ink off of there, so as soon as the image printed, I cut it out and put it face down on my pendant.  I rubbed the back a bit, and the print was transferred from the cling wrap to my pendant!  Cool right?
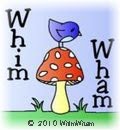
Since this wasn't a flat surface, they are kind of blurry, but we were still happy with the results.  I sprayed them with an acrylic sealer too, so the ink doesn't run if it gets wet.  Here's how they turned out.  The transfers are the flower (very light and hard to see), the lucky clover (which I accidently smeared, because I'm not lucky), and the bird on a mushroom.  Hey, I got 1 out of 3!  I know...I suck, but you can always paint over them and try again!

paper mache jewlery with inkjet transferspaper mache jewlery with inkjet transfers
I think it would be cool to try this cling wrap method in other crafts.  Maybe print a picture on it, let it dry, peel it off, and then iron it (with something covering the cling wrap of course- never iron directly) face down onto another surface...like napkins for a party or something.   Lots of cling wrap possibilities!  Wait...that came out wrong!  Anyway, you get the idea.  Give it a try!

Sunday, February 21, 2010

I Love Japanese Craft Books!

Japanese craft books
If you have ever looked through Japanese craft books, I'm sure you too would fall in love with some of the cool projects inside of them. I have over time, started a collection of 30 or so books and love looking through them whenever I can.
The downfall of Japanese crafting is the language barrier, but for the most part, the books are visually descriptive enough, that it is possible to get a pretty good understanding of how to do things by just looking at the pictures. There are also a couple of good websites out there on crafting Japanese.
This site has a lot of pictures from people who have completed patterns, and it offers a great deal of information. It is a good place to visit! http://craftlog.org/craftingjapanese/

If you are wanting to purchase books, there are several places that sell them online.
Crafting Japanese website has a great list of online sellers. Just remember that anywhere you buy from within the states is going to cost quite a bit more.
I personally order from Amazon Japan. The shipping costs are high, but it still comes out cheaper than buying from anywhere that I have seen within the states. The crafts books generally cost around $10 to $15, more or less a book. I usually buy around 10 books or more per order, so it balances out the shipping costs. My average cost ends up being around $20 or less per book. The shipping costs for books are 2,700 yen per order, with an additional 300 yen per item. The exchange rate changes all of the time, but at the time of writing this, that converts to $29.50 shipping per order, plus $3.27 per item. (To check the exchange rate, just type the yen amount to US dollar in the Google search bar...example 2700 yen to USD.)
I have had no problems ordering from Amazon Japan. The site is available now in English, making ordering a lot easier. The items ship very quickly (a few days), and I have never had to pay any customs fees.
The only problems I tend to encounter online, is not being able to see the inside of what I am buying. Amazon Japan does offer the look inside feature for some books, but not all of them. If I am not sure I want to take a chance on an unknown craft book, I usually Google the ISBN to try and find some more pictures or information about it. In doing so, I came across this cool site that shows all of the pictures inside of quite a few books.
http://photo.xuite.net/dada330703*5 (There are 9 pages worth of knitting and sewing books. This link drops you on the 5th page I believe).

Have some fun! Get inspired, and jump on the Japanese craft wagon! :)

Friday, February 19, 2010

A Day of Fun With My Girl!

I went and got my DBA today.  I am officially Whim Wham now!
My daughter Cora went with me and was amazed at how big the building (court house) was.  This building is like the size of a Barnes and Nobel in the city.  I didn't realize until then how sheltered she is becoming living in the country.  Time to take a trip to Chicago and show her some real big buildings.
Anyway, we wanted to celebrate the new business, so I let Cora pick somewhere to go out to eat tonight. She picked her favorite restaurant of course, China Buffet.  She was so cute tonight, eating with her chopsticks and congratulating me a hundred times. She even did a cheers with her glass to mine.  I had a great time hanging out with her.  She seemed so grown up to me today.
Cora using chopsticks
After we ate, I had to stop at the store to get some shipping supplies.  Cora had money from Grandma burning a hole in her pocket, so she bought a bucket of glow in the dark plastic perler beads (those things you arrange into patterns on pegs, and melt together with an iron).  These plastic beads rank right up there on my list of favorite crafts, as plastic canvas does, but she couldn't wait to use them (I love that she wants to spend her money on crafting supplies :).  So, we got home, tore into that bucket and made melted bead art literally all night.  Her room is just glowing!  Couldn't have asked for a better day!

name plate made of perler beadsstar mobil made from glow in the dark perler beadsGlow in the Dark Perler Bead Activity Kit

Thursday, February 18, 2010

Uncle Sam called, and he wants his cut!

Well, I made a little more progress today.  I had no idea this hobby/adventure was going to turn into such a task.  I found out today that Etsy store owners have to get a DBA (unless doing business just as your own name I suppose).  I also have to file for a state tax certificate.  So, that should be fun times. The list just keeps growing.  Every time I think I am getting a little bit closer to opening my shop, it falls a little further away...but that's ok...I can run in place all day!

I can't wait to just hang out with my little peanut this weekend.  She doesn't have school tomorrow because of PT conferences.  I see a weekend full of parties (everything is a party to her lately), and making snow angels (before all of the snow melts).  Hopefully she'll help me get together something fun for this blog too, instead of my whining and complaining posts! :) 

My little snow angel Cora!

Making the plunge and wishing I had floaties!

I have been sitting back and silently reading craft blogs, thinking to myself... "I would like to have a craft blog too someday.  That would be fun!".  Well, the time has come and I am diving in, but I am starting to feel like I can barley keep my head above water.  I am trying to get everything set up all at the same time, and am feeling slightly overwhelmed. I have started this blog, an Etsy store, a Flickr, you tube, Twitter (still not even sure what that is??), and all of the web analytics stuff (also very confusing).  I cannot wait until all of this becomes second nature, but until then, please bear with me. 
I will learn this...probably while publicly embarrassing myself on occasion, but by golly, I am not giving up after all of the work thus far.  I now have a much greater appreciation to all of the craft bloggers and etsy store owners out there.  Thanks for all of your time and effort! :)
Related Posts with Thumbnails
 
Blogging tips