Welcome to Whim Wham's Craft Blog!

I love to craft, sew, knit, crochet, needle felt...ect. Unfortunately, no one around me shares this passion. So, I am branching out into cyber world, hoping to connect with a few crazy...I mean crafty people like me. Enjoy! :)


Wednesday, March 9, 2011

♣ How to Make a Crocheted Clover or Shamrock ♣

crocheted shamrock clover


Saint Patricks Day is around the corner and it is time for "the wearing of the green"!  Why a Shamrock???  Well, Irish folklore showed that St. Patrick used the shamrock as a symbol to teach pre-Christian Irish people about the Holy Trinity.  My lesson isn't going to quite compare, but I will be teaching you how to make a crocheted shamrock for you to share with your friends and family!

Materials Needed:
Scissors
4 ply green yarn
size H crochet hook
pin back or clip
adhesive

Pattern:
Leaving a 4 in tail, Chain 3.  Double crochet in the chain 1 space 3 times. Chain 2 and slip stitch in the same chain 1 hole that the double crochets were made in (all stitches will be made in this same hole for the remaining petals) Petal one is complete. Now, *chain 2 and double crochet 3 times followed by chain 2 and a slip stitch.  Repeat from * one more time. You should now have all 3 petals completed.  To make the stem, chain 5 from your last slip stitch.  Single crochet in the 2nd chain from the hook, single crochet in the next chain, slip stitch into the next, and slip stitch into the last one as well.  Bring your tail end through your last stitch and pull tight.  Cut your yarn and tie both tail ends together on the back.

If you want to make these bigger or smaller, just adjust the yarn and hook size accordingly.  Now that you have your shamrock completed, either glue it to a hair clip or pin back and wear it proudly.  These are so quick and easy to make.  Whip up a batch and hand them out, so no one is without green on St. Patty's Day!

As always, feel free to ask any questions or leave comments.

Thursday, February 24, 2011

Going Green Napkins

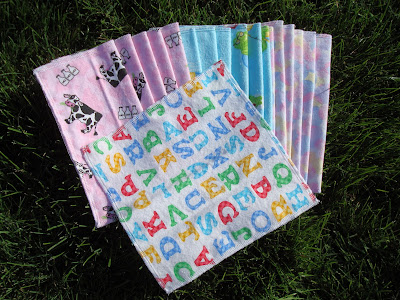
flannel reusable napkins


With the dreary winter we have had, it does some good to focus on something green! ☺

I made these eco friendly paper towels back in June, but didn't want to post about them until they have been put to the test of everyday use.  They were very simple to make.  I cut some 8in x 8in squares out of scrap flannel that I had left over from cloth diapers I made forever ago (Don't you love when those fabric prints come back around into something new and different!).  Pre-shrink your fabric before cutting your squares though, so they stay the right size.  I have a serger, so I just did an overlock stitch around the outside edges.  I suppose you could cut a bigger square and hem the edges, or possibly just trim them with pinking shears and have a little fraying going on.  Overall, it was very easy to make quite a few of them in a short amount of time.

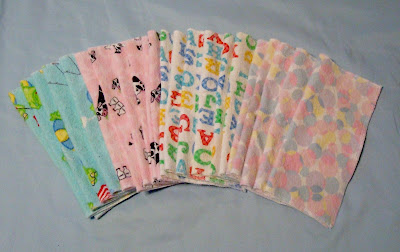
flannel paper towelsNow, the answer to the question...How did they hold up to the abuse of a family actually using them?...Great!
I thought these things would look so nasty in about a month, but to my surprise, they remained clean and just slightly pilled.  This picture is after 8 months of use.
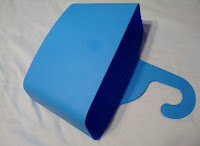
hanging plastic storage bin
This is what we do with ours.  We keep the clean ones in a regular napkin holder.  I hung a plastic bin, that I found at Hobby Lobby, on the kitchen cabinet in front of the sink to put them into after use. When it gets full, I just throw them in the wash with a load of towels.
Making this change couldn't have been easier, and it has cut our paper towel use down considerably.  We love the feel of the soft flannel so much better too.  It's better for the earth and the pocketbook!
Give them a try.  You'll be glad you did! :)

Monday, February 14, 2011

Happy Valentine's Day!

needle felted Slimey the worm Valentine


Hope everyone is having a lovely day!
I have been spoiling my daughter pretty good today.  I went and had lunch with her.  She was so excited when I brought her heart shaped pancakes, eggs and apples.  She told me this morning she is going to give me a back massage when she gets home...after we do crafts of course!  I love how thoughtful and sweet she is.  She's my perfect little valentine!
I hope you have a great day with your perfect little valentine's too!  These are pictures of some of my needle felted creations wishing you a happy day!  Feel free to click and save either of these photos and send one to someone special! 
Enjoy! :)

needle felted mouse valentine

Thursday, February 10, 2011

"Stick With Me" - Wool Felt Valentine Monster

wool felt monster
 I wanted to share this pattern of a little felt monster I made last year for Valentines day.  I didn't get my blog started soon enough to share it last year, so I figured I would put it on here now!  He's really simple to make.  I cut mine out of red wool felt...a front and back of the body.  I sewed around it using a whipstitch, leaving a little opening for the fiberfill.  I also did a stab stitch through the arms, securing them between the body front and back. I know that it says to cut 4 pieces for the eyes...and you can, but another thing I did, was put a small piece of pipe cleaner bent like a V up and out of the eye-sockets. I then coiled the remaining pipe cleaner and glued on the felt eyes (you could also use googly eyes).  Once the monster is done, cut 2 pieces of felt  for the heart, whip stitching around it and filling it with fiberfill.  Bring the monster hands forward, either gluing or stitching them to the heart.
You can make this alien/monster happy or sad...or a combo of  both.  I called it "stick with me", but there's no saying it can't be "stuck with you" as well!☺
Like I said, it's quick to make,  fun and a good gift for a boy!
Here's the pattern.
wool felt monster pattern

Feel free to ask any questions or leave comments!
Enjoy! ♥

Tuesday, February 8, 2011

Buried Under the Rubble

What happened...I blacked out!  Who abandons their blog for over 6 months?  Apparently I do!  I wish I had some fabulous excuse for my absence, however none of them are good enough.
It all started when we had to make the choice to tear our building down.  I was pretty busy emptying it out for quite some time.  It was not an easy decision to demo it, but the cost of fixing the damage was more than tearing it down.  It was a really difficult to watch something so old and beautiful be destroyed, but we were out of options.  The building was built in the late 1800's and went down with quite a bang.  For weeks we filled a semi trailer full of all the contents in the building that my dad had collected over the last 25 years.  My sister and I thought the semi trailer parked in front of the building was the one containing all of his things, so when the whole front of the building fell down unexpectedly crushing and flipping the trailer, you can imagine our surprise (which explains my sister's swearing in the video).  Luckily no one was hurt, but here is a video of the building falling down not as we planned.


I guess when the building fell, my blog got buried with it.  I got so wrapped up in it, that everything else kinda took the back burner and I just never found my way back.  I have really missed blogging though and hope to get back to posting on a more regular basis again.  I have done quite a bit of crafting over the months and have plenty of projects to share.
So once again, I apologize for the abandonment and hope to bring you some more fun projects and patterns here soon! :)

Tuesday, June 22, 2010

A Prairie Bonnet for My Little Girl ♥

Prairie Bonnet

I made a prairie bonnet for Cora today.  She asked for one this summer to keep the sun out of her eyes.  
I love watching period piece films.  Cora watches them with me sometimes, occasionally asking me to make her something that one of the little girls is wearing.  My poor kid has no idea what year it is in the fashion world.  I know she'll figure it out soon enough, but for now, I am going to enjoy how cute she looks in this!
She also asked me for a petticoat and bloomers for her birthday.  I can't wait to see it all together!

I had no idea how to make a prairie bonnet, so I just measured her head and drew a pattern that I thought would work.  I made this from a recycled bed sheet.  It's a bit snug around her head ear to ear, so I'll have to increase it a bit there.  Otherwise it turned out ok.  I made it long enough to cover her neck in the back, to protect it from the sun.  I may change the brim a little bit too, so it covers the sides of her face better (didn't want to block her peripheral vision completely! =) .  My niece wants one now too, so I'll see how the changes go on the next one. 

Cora's bonnet already saved her from a branch lashing in the face though!  She was pulling crab apples off of the tree as I was taking her picture.  The tree fought back!  I happened to click the photo right then for an action shot.  Straight hit to the bonnet!  Better than the face right?!?!  So, needless to say she's already fond of it!


Monday, June 21, 2010

I Finally Built a Light Box!


I have been procrastinating building a macro light box for sometime now. Thanks to Thea at That Yarn Store, I have been given a little push to finally get it done today.  She has been posting lately on her adventures in becoming a better photographer. Check it out for some laymen's, non overwhelming and helpful ways to start being a better photographer.
When crafters start selling online at Etsy, photography becomes kind of a necessity.  Did I mention I suck at this!  I know that my cardboard light box won't transform my abilities, but it does make a statement that says-"Hey I'm trying!"
CowboyStudio Table Top Photo Studio Light Tent Kit in a Box - 1 Tent, 2 Light Set, 1 Stand, 1 CaseThere are a lot of tutorials on how to build one of these.  Just Google how to make a macro light box.  Amazon also sells a couple for pretty cheap too, like this one.  Just read the reviews before buying (helpful advice in those).


I want to stop having Etsy photo envy and start taking some better shots of my own.  It can't hurt to try! I still need to get a better light source, but Gus my needle felted mouse gave me an A+ and an apple for my efforts! =)

Related Posts with Thumbnails
 
Blogging tips