Saturday, June 19, 2010
Build a Fairy House
I have wanted to build a fairy house for forever. My younger sister Cera loves nature and crafting, so we decided to give it a go! We collected a few rocks from around my dad's farm and gathered up some branches, moss and anything that we thought looked neat. We started pretty late at night so, we had a sleepover and one night to think of what we were going to do with all of our new found treasures. I could not wait until morning to start build this thing. I had a million ideas going through my head. I was up at the crack of dawn, equip with my glue gun and some fairy furniture sketches. We found a huge piece of fools gold and some pieces of bark to make archways over the rocks with. We started by covering everything in moss and stuck a few fake flowers into it. It already looked pretty cool. We put moss on the ground all around the fools gold house, and made stepping stones with some smaller rocks leading up to it.
This house was looking pretty cool, but not quite lived in yet. It was time to build some furniture. The night before we had made a couple fake mushrooms, plates, cups, and a cake out of polymer clay. I knew we were going to need a table and chairs. Cera wanted the fairies to have something fun to do, so she made a swing-set.
The ideas just kept pouring out! Before, I knew it we had the chop saw out and were cutting up sticks we found lying around the yard. We made beds, a lamp, a couch, a table and chairs, a swing-set, a sink from a seashell, and some brooms to sweep up the kitchen with. It wasn't even noon yet and the fairies could have moved in already. To top it off we put a door going into the tree with a ladder and some steps leading up to it. There is a spot behind the main rock with the archway that we put a tea light candle at night (safely!). The whole house was glowing beautifully! The kids think the tree is now full of fairies! Who knows, maybe it is! =)
We had a lot of fun making this! Building a fairy house was a great activity to get the kids working together outdoors, looking at nature in a different perspective. You don't need to get as crazy as we did with a chop saw...a glue gun, a little nature, and some imagination would be plenty to make your very own fairy house. This was a lot easier than I thought it was going to be. I can't wait to make an indoor play version!
Be sure to post your fairy house pictures on the Whim Wham Craft Blog Flickr group. Help out the homeless fairies in your neighborhood and Build a Fairy House! =)
Did Whim Wham fall off the face of the earth?
No. I am still here, but my apologies on the lack of posts. I went on a vacation, and found out there was no internet where I was staying. (Not so relaxing for me, but probably a break I needed to take. I just would have prepared better had I known.) Anyway, lots of fun stuff going on here!
I had a nice vacation. I still did manage to work a little though. I got an Etsy order while I was vacationing and happened to be where the customer lived, so she asked to meet me. It was really nice to meet a buyer in person. It was an unexpected and very cool part of my trip. It's so nice to put a face with a name! =)
I also hit some garage sale's. Only I would garage sale on vacation! They were having a neighborhood garage sale where we were staying at my friends house, so I couldn't resist.
My daughter got a pet parrot for $10, that she absolutely loves. She really lucked out because he costs $350 in the store and Mom would have never spent that much on a toy. I guess since real parrots cost so much, people pay this???? Anyway, he is pretty cool and almost as annoying as the real thing!

I also lucked out an found a cool vintage sheet and some nice eyelet pillowcases. Gotta love the vintage fabric finds at garage sales! =)
We also went to a baseball game, a drive in movie, went bowling and made some huge sidewalk chalk drawings.
Overall, we had a really nice time. Now back to reality and all that I have been neglecting!
I had a nice vacation. I still did manage to work a little though. I got an Etsy order while I was vacationing and happened to be where the customer lived, so she asked to meet me. It was really nice to meet a buyer in person. It was an unexpected and very cool part of my trip. It's so nice to put a face with a name! =)
I also hit some garage sale's. Only I would garage sale on vacation! They were having a neighborhood garage sale where we were staying at my friends house, so I couldn't resist.
I also lucked out an found a cool vintage sheet and some nice eyelet pillowcases. Gotta love the vintage fabric finds at garage sales! =)
We also went to a baseball game, a drive in movie, went bowling and made some huge sidewalk chalk drawings.
Overall, we had a really nice time. Now back to reality and all that I have been neglecting!
Tuesday, May 25, 2010
When it Rains it Pours!
"When it rains it pours!" my grandma would always say to me when things weren't going her way. However, sometimes when it rains and pours, it can be the very cause of nothing going your way!
First I want to apologize for the lack of posts lately and offer an explanation for my absence. My father owns a historical building that did not weather the recent storms. A severe wind storm peeled back pieces of the roofing and left a historically huge disaster behind. We were not aware of the damage until after it rained for days, filling the building up like a bucket. When I first discovered what had happened, I wanted to cry. Pieces from the 18 ft ceiling had fallen down, and the beautiful hard wood maple floors buckled up about 1 ft off the ground. The whole building was basically ruined!
My father is out of town on business. So for the last 2 weeks, I have been dealing with this disaster and a renovation team that is trying to determine if the building is even going to be salvageable. It has been heart breaking to watch them tear everything out of there and toss it into dumpsters....100 year old doors, the entire original maple floor, all of the contents that we had in there. The news just keeps getting worse and it looks like our historical building will soon be history. I can't even image them knocking it down. It is the 2nd oldest building in our town, and it has been there forever. I have spent so much of my life in that building. I grew up dancing in there (yes I used to be a dancer haha!). I opened my first business up with my best friend there too. Lots of good memories!
Anyway, sorry for rambling on.
I have still managed to get some crafting done in between the chaos. I cut out about 350 wool felt covers for the needle felted hair clips I make on Etsy. (It was actually kind of therapeutic. Crafting often can be good therapy!) I also did some needle felting...nothing helps you distress like stabbing something with a needle a couple thousand times!
I had a baby shower to go to for my cousin this weekend too, so I made her baby girl a matching gift set. I appliquéd and sewed a onesie dress, two burp clothes, a pacifier clip, and a reversible bonnet. I made everything the morning of the baby shower and still managed to arrive looking like I've slept and showered recently! =)
So, that's what's been going on with me for the last couple of weeks. Hopefully, I will have so more free time soon, to put a decent tutorial on here, and catch up on my 870 items I haven't read yet in Google reader! Wish me luck!
First I want to apologize for the lack of posts lately and offer an explanation for my absence. My father owns a historical building that did not weather the recent storms. A severe wind storm peeled back pieces of the roofing and left a historically huge disaster behind. We were not aware of the damage until after it rained for days, filling the building up like a bucket. When I first discovered what had happened, I wanted to cry. Pieces from the 18 ft ceiling had fallen down, and the beautiful hard wood maple floors buckled up about 1 ft off the ground. The whole building was basically ruined!
My father is out of town on business. So for the last 2 weeks, I have been dealing with this disaster and a renovation team that is trying to determine if the building is even going to be salvageable. It has been heart breaking to watch them tear everything out of there and toss it into dumpsters....100 year old doors, the entire original maple floor, all of the contents that we had in there. The news just keeps getting worse and it looks like our historical building will soon be history. I can't even image them knocking it down. It is the 2nd oldest building in our town, and it has been there forever. I have spent so much of my life in that building. I grew up dancing in there (yes I used to be a dancer haha!). I opened my first business up with my best friend there too. Lots of good memories!
Anyway, sorry for rambling on.
I have still managed to get some crafting done in between the chaos. I cut out about 350 wool felt covers for the needle felted hair clips I make on Etsy. (It was actually kind of therapeutic. Crafting often can be good therapy!) I also did some needle felting...nothing helps you distress like stabbing something with a needle a couple thousand times!
I had a baby shower to go to for my cousin this weekend too, so I made her baby girl a matching gift set. I appliquéd and sewed a onesie dress, two burp clothes, a pacifier clip, and a reversible bonnet. I made everything the morning of the baby shower and still managed to arrive looking like I've slept and showered recently! =)
So, that's what's been going on with me for the last couple of weeks. Hopefully, I will have so more free time soon, to put a decent tutorial on here, and catch up on my 870 items I haven't read yet in Google reader! Wish me luck!
Posted by
WhimWham
Posted at
8:00 AM
in:
gift ideas,
hair clips,
Ramblings,
sewing,
wool felt
2
comments
Wednesday, May 12, 2010
Travel Tissue Cover Tutorial
Today was the last day of Jam Junction (an after school program my daughter liked going to at our church). She really liked going and is bummed that it's ending for the year. So to thank the Pastor and all the volunteers for the fun she has had, I decided to make little "Bless You" travel tissue covers for her to give as gifts. I am sure there are plenty of tutorials out there on how to make these, but I am going to share my version anyway. =)
I made them with 2 different fabrics- 6" x 7"outer fabric and 6"x 8" lining fabric. These dimensions will give you a 1/4" border around the opening. If you want more lining fabric to show, creating a thicker border, cut the lining fabric bigger and the outer fabric smaller. For example- for a 1/2" border, cut a 6" x 6 1/2" outer and a 6" x 8 1/2" lining. Another option is to put all of the lining fabric to one end, creating a wide border only on that end (making that the side you use when you overlap the ends). Confused yet??? Maybe some pictures will help!
I made 4 covers with a 1/4" border. (as you will see by the multiple covers in the photos)
First, cut out 1 outer and 1 lining fabric. With the right sides facing together, sew along the 6" side on both ends with a 1/4" seam allowance (the lining fabric will be kind of bunched up in the middle). Once you have sewn both ends, turn right side out and iron. (Here is where you can either put a 1/4" border on each side, or 1/2" border all to one side. I chose to put 1/4" on each side).
The next step is optional, but sure makes the cover look a lot nicer. It's time to embellish it! I chose to use decorative stitches on my sewing machine. I chose a flower pattern with the words "Bless You" (since these are for our church). I know not everyone has a decorative stitch option, but instead you could sew on some ribbon, ric rac, appliqué, buttons, hand embroider it, or just sew some zigzags! Anything you want!
Now that your cover is embellished, it is time to finish sewing it together. Find the center and overlap the borders on that center line (not overlapping more than 1/4"). Make sure to put the side you want to show more of, on the top (for example- I put the "Bless You" side on the top). Here is where you would also overlap the one sided border on top, if you chose to put all of the lining fabric to one side.
We are going to make a french seam, so we will be sewing it together how the finished cover is going to look. Sew very close to the edges- about 1/8" seam allowance. Do this on both ends. Trim and cut any stray threads, then turn the cover inside out (use a chopstick to push the corners out nice ). We are going to be enclosing our seam to give the cover a nice smooth lining. Sew another seam (a little over 1/8") enclosing the raw edge of our previous seam, like in th photos below. Do this on both ends.
Turn the cover right side out again and fill with a pack of travel tissue (Our Wal-Mart sells them in the travel sample isle, 3 packs for $1). Be even more eco friendly and fill it with washable hankies! =)
These travel tissue covers make a great quick gift idea for almost anyone! I hope you enjoy making them as much as I do!
As always all questions and comments are welcome! =)
Posted by
WhimWham
Posted at
8:17 PM
in:
crafty ideas,
Free,
gift ideas,
patterns,
sewing,
tutorials
7
comments
Tuesday, May 4, 2010
Alice in Wonderland Apron
I had a busy weekend that ended with me and my daughter sick, and at the doctors on Monday. I meant to post this earlier, but as you, know life happens! So better late then never!
My daughter wants to have an Alice in Wonderland birthday party this year, and has been asking for me to make her a dress and apron. Well I got on the web to do a little research and look for some ideas, when I landed on Amy Karol's (Angry Chicken) Tie One On blog. She is having an Alice in Wonderland apron contest. I of course had to participate. I was going to be making one anyway, so I might as well, right?!
When I looked at the deadline, it said May 1st. I originally wasn't going to make this apron until July, but 24 hrs works too! So, I stayed up all night and frogged my way through an Alice apron. I made it out of a king size eyelet pillowcase and pink bias tape. I had to use the seam ripper more than I cared for but overall it turned out OK.
There is a funny ending to this story though. When I went to send my pictures to Amy, I had to go back to the Tie One On website to get her email address. The first thing I saw when the page opened, was that the contest had been extended to June 1st! I laughed so hard! So much for staying up all night! It was my own stupid fault for not checking the main blog page for updates. I only read the page I landed on in my search which said May 1st.
So, for once in my life, I am a month early in entering a contest! Whoo hoo!
Now I can procrastinate on finishing the matching dress! =)
My daughter wants to have an Alice in Wonderland birthday party this year, and has been asking for me to make her a dress and apron. Well I got on the web to do a little research and look for some ideas, when I landed on Amy Karol's (Angry Chicken) Tie One On blog. She is having an Alice in Wonderland apron contest. I of course had to participate. I was going to be making one anyway, so I might as well, right?!
When I looked at the deadline, it said May 1st. I originally wasn't going to make this apron until July, but 24 hrs works too! So, I stayed up all night and frogged my way through an Alice apron. I made it out of a king size eyelet pillowcase and pink bias tape. I had to use the seam ripper more than I cared for but overall it turned out OK.
There is a funny ending to this story though. When I went to send my pictures to Amy, I had to go back to the Tie One On website to get her email address. The first thing I saw when the page opened, was that the contest had been extended to June 1st! I laughed so hard! So much for staying up all night! It was my own stupid fault for not checking the main blog page for updates. I only read the page I landed on in my search which said May 1st.
So, for once in my life, I am a month early in entering a contest! Whoo hoo!
Now I can procrastinate on finishing the matching dress! =)
Tuesday, April 27, 2010
Soccer Mom of The Bearded Child!
Friday, April 23, 2010
How to Make a Snail Ribbon Hair Clip
I saw a little girl wearing one of these in her hair, and thought..."I have to make that!". I don't work with ribbon very much, but being a crafter, I had plenty of it laying around. I don't know if I made this right, but I think it turned out well enough to pass on to the crafty community! =)
Here is what you will need to get started-
- 4 pieces of ribbon. 3 1/2" for the body, 2 1/2" to cover the clip, 1 3/4" for the antenna, and 21" for the shell
- wooden skewer or dowel rod and clips to make curly korker ribbon
- hot glue gun
- scissors
- lighter (not shown). This is used to seal the ends of the ribbon to prevent fraying
- snap hair clip
First seal all ends of the ribbons by placing them near the flame of the lighter. Test this on a scrap piece first to get the hang of it (warning- do not do this with cotton ribbon. It will catch on fire. Only polyester- the silky kind). The end of the ribbon will melt a little, giving it a nice sealed edge. Next, we are going to make the korker ribbon for the shell. Clip one end of the 21" ribbon to the end of the skewer and wrap in around in a spiral, securing it with another clip (as in the photo to the left). Once your skewer or dowel is wrapped, place it on a cookie sheet or tin foil in a 275 degree oven for 20 minutes.
While the korker ribbon bakes, we will make the rest of the clip. The clip I saw the little girl wearing was an alligator clip. I however didn't have one, so I had to improvise and use a snap clip. I wanted to cover the front of the clip with ribbon for 2 reasons. I thought it would look nicer, and I also needed a surface to glue the snail on to. This is a little finicky, but it serves its purpose well. I took plenty of pictures to better help explain my poor writing skills! =)
The first thing you want to do is unsnap the clip. Place a thin bead of glue all around the top part of the clip, just do not put any on the middle part that snaps open. Quickly put your 2 1/2" piece of ribbon on top of the glue before it sets, and smooth it out as you close the clip. Open and close the clip after it cools to make sure the center didn't get glued shut. Next, cut around the clip leaving a tiny bit of overhang. Being careful not to burn yourself, pass the cut edges near the flame of the lighter (I find it easier to use a candle lighter). You will see the edge of the ribbon shrink in a bit as it seals. Do this around the entire clip. We now have a blank clip all ready for a new snail to live on!
Let's make the snail body. Take the 3 1/2" piece of ribbon and wind it around like in the picture below, making the tail narrower than the head. Once you have it the way you like it, place a couple dabs of glue to hold it in place. Make a slight bend in the body for the snail head, and glue it onto the clip.
What's a snail without antennas? To make the antennas cut the edges off of the 1 3/4" ribbon and place them on a cookie sheet or aluminum foil. We are going to run the lighter over them several times, allowing them to melt and shrink. This will give them some more stability and keep them from becoming a frayed disaster. Once your antennas are to your liking, place a dab of glue in the snails head. Put both antennas into the glue and squeeze the head closed.
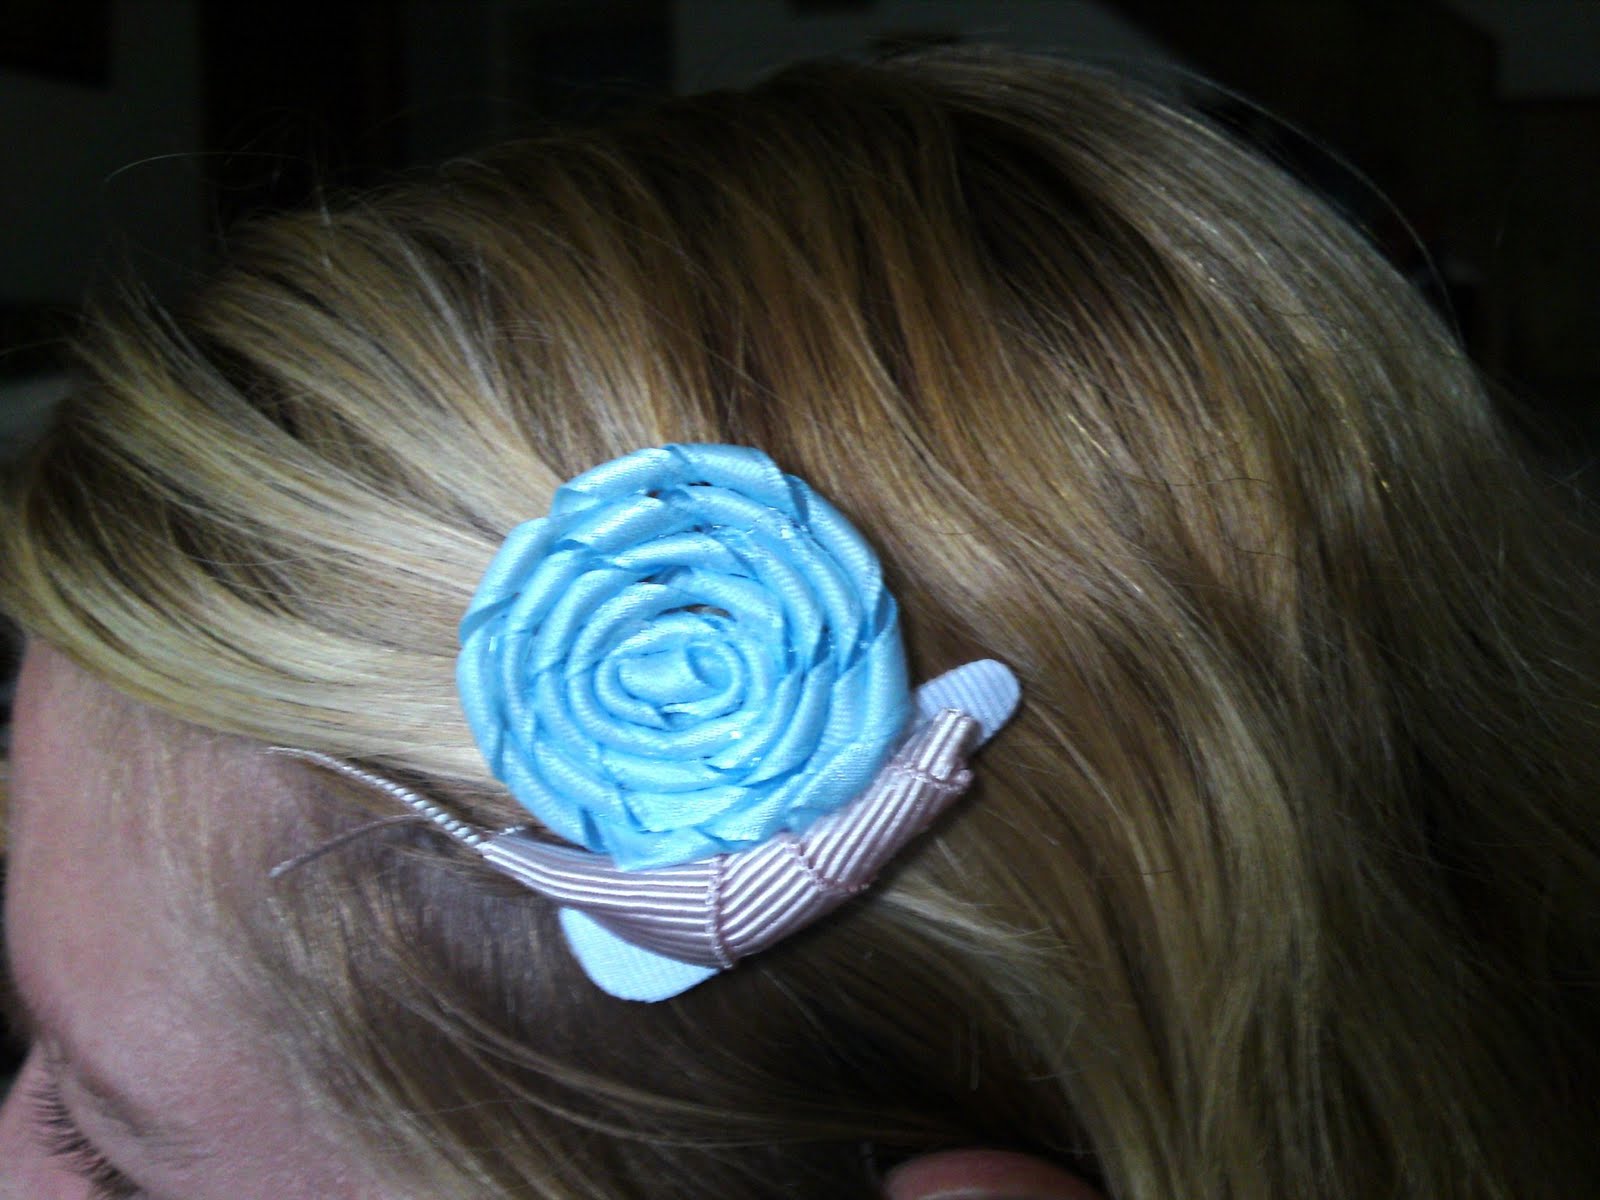
By this time, your korker ribbon should be done, or close to it. Once it is done, remove it from the skewer. The snail shell is made by winding the korker ribbon around in circles like a lollipop. Start by rolling one end in and gluing it as you go. Make sure to keep the curl in the ribbon tight. Run a bead of glue along the edge of the circle you are forming, securing each ring to the next. When you are done it should look like a ribbon lollipop (a great idea for another clip, right?!). Place some glue along the snails back and on the clip above it, and glue the shell into place. You now have a cool snail hair clip that any kid is sure to love!
The clips lay nicely against the head. My sister was kind enough to model for a photo. I made 2 snail clips today. One for my niece and one for my spoiled daughter of course. They loved them!
Have fun making your own snail clips and be sure to post your pictures of them at the WhimWham Flickr Group! Questions and comments are welcome as always! =)
Posted by
WhimWham
Posted at
4:43 PM
in:
crafty ideas,
Free,
hair clips,
sewing,
tutorials
0
comments
Subscribe to:
Posts (Atom)