Welcome to Whim Wham's Craft Blog!

I love to craft, sew, knit, crochet, needle felt...ect. Unfortunately, no one around me shares this passion. So, I am branching out into cyber world, hoping to connect with a few crazy...I mean crafty people like me. Enjoy! :)


Wednesday, March 9, 2011

♣ How to Make a Crocheted Clover or Shamrock ♣

crocheted shamrock clover


Saint Patricks Day is around the corner and it is time for "the wearing of the green"!  Why a Shamrock???  Well, Irish folklore showed that St. Patrick used the shamrock as a symbol to teach pre-Christian Irish people about the Holy Trinity.  My lesson isn't going to quite compare, but I will be teaching you how to make a crocheted shamrock for you to share with your friends and family!

Materials Needed:
Scissors
4 ply green yarn
size H crochet hook
pin back or clip
adhesive

Pattern:
Leaving a 4 in tail, Chain 3.  Double crochet in the chain 1 space 3 times. Chain 2 and slip stitch in the same chain 1 hole that the double crochets were made in (all stitches will be made in this same hole for the remaining petals) Petal one is complete. Now, *chain 2 and double crochet 3 times followed by chain 2 and a slip stitch.  Repeat from * one more time. You should now have all 3 petals completed.  To make the stem, chain 5 from your last slip stitch.  Single crochet in the 2nd chain from the hook, single crochet in the next chain, slip stitch into the next, and slip stitch into the last one as well.  Bring your tail end through your last stitch and pull tight.  Cut your yarn and tie both tail ends together on the back.

If you want to make these bigger or smaller, just adjust the yarn and hook size accordingly.  Now that you have your shamrock completed, either glue it to a hair clip or pin back and wear it proudly.  These are so quick and easy to make.  Whip up a batch and hand them out, so no one is without green on St. Patty's Day!

As always, feel free to ask any questions or leave comments.

Thursday, February 24, 2011

Going Green Napkins

flannel reusable napkins


With the dreary winter we have had, it does some good to focus on something green! ☺

I made these eco friendly paper towels back in June, but didn't want to post about them until they have been put to the test of everyday use.  They were very simple to make.  I cut some 8in x 8in squares out of scrap flannel that I had left over from cloth diapers I made forever ago (Don't you love when those fabric prints come back around into something new and different!).  Pre-shrink your fabric before cutting your squares though, so they stay the right size.  I have a serger, so I just did an overlock stitch around the outside edges.  I suppose you could cut a bigger square and hem the edges, or possibly just trim them with pinking shears and have a little fraying going on.  Overall, it was very easy to make quite a few of them in a short amount of time.

flannel paper towelsNow, the answer to the question...How did they hold up to the abuse of a family actually using them?...Great!
I thought these things would look so nasty in about a month, but to my surprise, they remained clean and just slightly pilled.  This picture is after 8 months of use.
hanging plastic storage bin
This is what we do with ours.  We keep the clean ones in a regular napkin holder.  I hung a plastic bin, that I found at Hobby Lobby, on the kitchen cabinet in front of the sink to put them into after use. When it gets full, I just throw them in the wash with a load of towels.
Making this change couldn't have been easier, and it has cut our paper towel use down considerably.  We love the feel of the soft flannel so much better too.  It's better for the earth and the pocketbook!
Give them a try.  You'll be glad you did! :)

Monday, February 14, 2011

Happy Valentine's Day!

needle felted Slimey the worm Valentine


Hope everyone is having a lovely day!
I have been spoiling my daughter pretty good today.  I went and had lunch with her.  She was so excited when I brought her heart shaped pancakes, eggs and apples.  She told me this morning she is going to give me a back massage when she gets home...after we do crafts of course!  I love how thoughtful and sweet she is.  She's my perfect little valentine!
I hope you have a great day with your perfect little valentine's too!  These are pictures of some of my needle felted creations wishing you a happy day!  Feel free to click and save either of these photos and send one to someone special! 
Enjoy! :)

needle felted mouse valentine

Thursday, February 10, 2011

"Stick With Me" - Wool Felt Valentine Monster

wool felt monster
 I wanted to share this pattern of a little felt monster I made last year for Valentines day.  I didn't get my blog started soon enough to share it last year, so I figured I would put it on here now!  He's really simple to make.  I cut mine out of red wool felt...a front and back of the body.  I sewed around it using a whipstitch, leaving a little opening for the fiberfill.  I also did a stab stitch through the arms, securing them between the body front and back. I know that it says to cut 4 pieces for the eyes...and you can, but another thing I did, was put a small piece of pipe cleaner bent like a V up and out of the eye-sockets. I then coiled the remaining pipe cleaner and glued on the felt eyes (you could also use googly eyes).  Once the monster is done, cut 2 pieces of felt  for the heart, whip stitching around it and filling it with fiberfill.  Bring the monster hands forward, either gluing or stitching them to the heart.
You can make this alien/monster happy or sad...or a combo of  both.  I called it "stick with me", but there's no saying it can't be "stuck with you" as well!☺
Like I said, it's quick to make,  fun and a good gift for a boy!
Here's the pattern.
wool felt monster pattern

Feel free to ask any questions or leave comments!
Enjoy! ♥

Tuesday, February 8, 2011

Buried Under the Rubble

What happened...I blacked out!  Who abandons their blog for over 6 months?  Apparently I do!  I wish I had some fabulous excuse for my absence, however none of them are good enough.
It all started when we had to make the choice to tear our building down.  I was pretty busy emptying it out for quite some time.  It was not an easy decision to demo it, but the cost of fixing the damage was more than tearing it down.  It was a really difficult to watch something so old and beautiful be destroyed, but we were out of options.  The building was built in the late 1800's and went down with quite a bang.  For weeks we filled a semi trailer full of all the contents in the building that my dad had collected over the last 25 years.  My sister and I thought the semi trailer parked in front of the building was the one containing all of his things, so when the whole front of the building fell down unexpectedly crushing and flipping the trailer, you can imagine our surprise (which explains my sister's swearing in the video).  Luckily no one was hurt, but here is a video of the building falling down not as we planned.


I guess when the building fell, my blog got buried with it.  I got so wrapped up in it, that everything else kinda took the back burner and I just never found my way back.  I have really missed blogging though and hope to get back to posting on a more regular basis again.  I have done quite a bit of crafting over the months and have plenty of projects to share.
So once again, I apologize for the abandonment and hope to bring you some more fun projects and patterns here soon! :)

Tuesday, June 22, 2010

A Prairie Bonnet for My Little Girl ♥

Prairie Bonnet

I made a prairie bonnet for Cora today.  She asked for one this summer to keep the sun out of her eyes.  
I love watching period piece films.  Cora watches them with me sometimes, occasionally asking me to make her something that one of the little girls is wearing.  My poor kid has no idea what year it is in the fashion world.  I know she'll figure it out soon enough, but for now, I am going to enjoy how cute she looks in this!
She also asked me for a petticoat and bloomers for her birthday.  I can't wait to see it all together!

I had no idea how to make a prairie bonnet, so I just measured her head and drew a pattern that I thought would work.  I made this from a recycled bed sheet.  It's a bit snug around her head ear to ear, so I'll have to increase it a bit there.  Otherwise it turned out ok.  I made it long enough to cover her neck in the back, to protect it from the sun.  I may change the brim a little bit too, so it covers the sides of her face better (didn't want to block her peripheral vision completely! =) .  My niece wants one now too, so I'll see how the changes go on the next one. 

Cora's bonnet already saved her from a branch lashing in the face though!  She was pulling crab apples off of the tree as I was taking her picture.  The tree fought back!  I happened to click the photo right then for an action shot.  Straight hit to the bonnet!  Better than the face right?!?!  So, needless to say she's already fond of it!


Monday, June 21, 2010

I Finally Built a Light Box!


I have been procrastinating building a macro light box for sometime now. Thanks to Thea at That Yarn Store, I have been given a little push to finally get it done today.  She has been posting lately on her adventures in becoming a better photographer. Check it out for some laymen's, non overwhelming and helpful ways to start being a better photographer.
When crafters start selling online at Etsy, photography becomes kind of a necessity.  Did I mention I suck at this!  I know that my cardboard light box won't transform my abilities, but it does make a statement that says-"Hey I'm trying!"
CowboyStudio Table Top Photo Studio Light Tent Kit in a Box - 1 Tent, 2 Light Set, 1 Stand, 1 CaseThere are a lot of tutorials on how to build one of these.  Just Google how to make a macro light box.  Amazon also sells a couple for pretty cheap too, like this one.  Just read the reviews before buying (helpful advice in those).


I want to stop having Etsy photo envy and start taking some better shots of my own.  It can't hurt to try! I still need to get a better light source, but Gus my needle felted mouse gave me an A+ and an apple for my efforts! =)

Saturday, June 19, 2010

Build a Fairy House

Fairy House

I have wanted to build a fairy house for forever.  My younger sister Cera loves nature and crafting, so we decided to give it a go!  We collected a few rocks from around my dad's farm and gathered up some branches, moss and anything that we thought looked neat.  We started pretty late at night so, we had a sleepover and one night to think of what we were going to do with all of our new found treasures.  I could not wait until morning to start build this thing.  I had a million ideas going through my head.  I was up at the crack of dawn, equip with my glue gun and some fairy furniture sketches.  We found a huge piece of fools gold and some pieces of bark to make archways over the rocks with.  We started by covering everything in moss and stuck a few fake flowers into it.  It already looked pretty cool.  We put moss on the ground all around the fools gold house, and made stepping stones with some smaller rocks leading up to it.
This house was looking pretty cool, but not quite lived in yet.  It was time to build some furniture.  The night before we had made a couple fake mushrooms, plates, cups, and a cake out of polymer clay.  I knew we were going to need a table and chairs. Cera wanted the fairies to have something fun to do, so she made a swing-set.
Fairy House Pictures

The ideas just kept pouring out!  Before, I knew it we had the chop saw out and were cutting up sticks we found lying around the yard.  We made beds, a lamp, a couch, a table and chairs, a swing-set, a sink from a seashell, and some brooms to sweep up the kitchen with. It wasn't even noon yet and the fairies could have moved in already. To top it off we put a door going into the tree with a ladder and some steps leading up to it.  There is a spot behind the main rock with the archway that we put a tea light candle at night (safely!).  The whole house was glowing beautifully! The kids think the tree is now full of fairies!  Who knows, maybe it is! =)
Fairy House Pictures

We had a lot of fun making this!  Building a fairy house was a great activity to get the kids working together outdoors, looking at nature in a different perspective.  You don't need to get as crazy as we did with a chop saw...a glue gun, a little nature, and some imagination would be plenty to make your very own fairy house.  This was a lot easier than I thought it was going to be.  I can't wait to make an indoor play version!

Be sure to post your fairy house pictures on the Whim Wham Craft Blog Flickr group.  Help out the homeless fairies in your neighborhood and Build a Fairy House! =)

Did Whim Wham fall off the face of the earth?

No.  I am still here, but my apologies on the lack of posts.  I went on a vacation, and found out there was no internet where I was staying.  (Not so relaxing for me, but probably a break I needed to take.  I just would have prepared better had I known.)  Anyway, lots of fun stuff going on here!
I had a nice vacation.  I still did manage to work a little though.  I got an Etsy order while I was vacationing and  happened to be where the customer lived, so she asked to meet me.  It was really nice to meet a buyer in person.  It was an unexpected and very cool part of my trip.  It's so nice to put a face with a name! =)
I also hit some garage sale's.  Only I would garage sale on vacation!  They were having a neighborhood garage sale where we were staying at my friends house, so I couldn't resist.
Hasbro FurReal Friends Squawkers McCaw ParrotMy daughter got a pet parrot for $10, that she absolutely loves.  She really lucked out because he costs $350 in the store and Mom would have never spent that much on a toy.  I guess since real parrots cost so much, people pay this????  Anyway, he is pretty cool and almost as annoying as the real thing!


I also lucked out an found a cool vintage sheet and some nice eyelet pillowcases.  Gotta love the vintage fabric finds at garage sales! =)
We also went to a baseball game, a drive in movie, went bowling and made some huge sidewalk chalk drawings.
Overall, we had a really nice time.  Now back to reality and all that I have been neglecting!

Tuesday, May 25, 2010

When it Rains it Pours!

"When it rains it pours!" my grandma would always say to me when things weren't going her way.  However, sometimes when it rains and pours, it can be the very cause of nothing going your way!
First I want to apologize for the lack of posts lately and offer an explanation for my absence.  My father owns a historical building that did not weather the recent storms.  A severe wind storm peeled back pieces of the roofing and left a historically huge disaster behind.  We were not aware of the damage until after it rained for days, filling the building up like a bucket.  When I first discovered what had happened, I wanted to cry.  Pieces from the 18 ft ceiling had fallen down, and the beautiful hard wood maple floors buckled up about 1 ft off the ground.  The whole building was basically ruined!
My father is out of town on business.  So for the last 2 weeks, I have been dealing with this disaster and a renovation team that is trying to determine if the building is even going to be salvageable.  It has been heart breaking to watch them tear everything out of there and toss it into dumpsters....100 year old doors, the entire original maple floor, all of the contents that we had in there.  The news just keeps getting worse and it looks like our historical building will soon be history.  I can't even image them knocking it down.  It is the 2nd oldest building in our town, and it has been there forever.  I have spent so much of my life in that building. I grew up dancing in there (yes I used to be a dancer haha!). I opened my first business up with my best friend there too.  Lots of good memories!

wool felt hair clip covers
Anyway, sorry for rambling on.
I have still managed to get some crafting done in between the chaos.  I cut out about 350 wool felt covers for the needle felted hair clips I make on Etsy.  (It was actually kind of therapeutic.  Crafting often can be good therapy!)  I also did some needle felting...nothing helps you distress like stabbing something with a needle a couple thousand times!


handmade baby gift set
I had a baby shower to go to for my cousin this weekend too, so I made her baby girl a matching gift set.  I appliquéd and sewed a onesie dress, two burp clothes, a pacifier clip, and a reversible bonnet.  I made everything the morning of the baby shower and still managed to arrive looking like I've slept and showered recently! =)


So, that's what's been going on with me for the last couple of weeks.  Hopefully, I will have so more free time soon, to put a decent tutorial on here, and catch up on my 870 items I haven't read yet in Google reader!  Wish me luck!

Wednesday, May 12, 2010

Travel Tissue Cover Tutorial

travel tissue cover

Today was the last day of Jam Junction (an after school program my daughter liked going to at our church).  She really liked going and is bummed that it's ending for the year.  So to thank the Pastor and all the volunteers for the fun she has had, I decided to make little "Bless You" travel tissue covers for her to give as gifts.  I am sure there are plenty of tutorials out there on how to make these, but I am going to share my version anyway. =)

I made them with 2 different fabrics- 6" x 7"outer fabric and 6"x 8" lining fabric.  These dimensions will give you a 1/4" border around the opening.  If you want more lining fabric to show, creating a thicker border, cut the lining fabric bigger and the outer fabric smaller.  For example- for a 1/2" border, cut a 6" x 6 1/2" outer and a 6" x 8 1/2" lining.  Another option is to put all of the lining fabric to one end, creating a wide border only on that end (making that the side you use when you overlap the ends). Confused yet???  Maybe some pictures will help!

I made 4 covers with a 1/4" border. (as you will see by the multiple covers in the photos)

First, cut out 1 outer and 1 lining fabric.  With the right sides facing together, sew along the 6" side on both ends with a 1/4" seam allowance (the lining fabric will be kind of bunched up in the middle).  Once you have sewn both ends, turn right side out and iron. (Here is where you can either put a 1/4" border on each side, or 1/2" border all to one side.  I chose to put 1/4" on each side).


The next step is optional, but sure makes the cover look a lot nicer.  It's time to embellish it!  I chose to use decorative stitches on my sewing machine.  I chose a flower pattern with the words "Bless You" (since these are for our church).  I know not everyone has a decorative stitch option, but instead you could sew on some ribbon, ric rac, appliqué, buttons, hand embroider it, or just sew some zigzags!  Anything you want!


Now that your cover is embellished, it is time to finish sewing it together.  Find the center and overlap the borders on that center line (not overlapping more than 1/4").  Make sure to put the side you want to show more of, on the top (for example- I put the "Bless You" side on the top).  Here is where you would also overlap the one sided border on top, if you chose to put all of the lining fabric to one side.
We are going to make a french seam, so we will be sewing it together how the finished cover is going to look.  Sew very close to the edges- about 1/8" seam allowance. Do this on both ends.  Trim and cut any stray threads, then turn the cover inside out (use a chopstick to push the corners out nice ).  We are going to be enclosing our seam to give the cover a nice smooth lining.  Sew another seam (a little over 1/8") enclosing the raw edge of our previous seam, like in th photos below. Do this on both ends.


Turn the cover right side out again and fill with a pack of travel tissue (Our Wal-Mart sells them in the travel sample isle, 3 packs for $1).   Be even more eco friendly and fill it with washable hankies! =)

These travel tissue covers make a great quick gift idea for almost anyone!  I hope you enjoy making them as much as I do!

travel tissue cover

As always all questions and comments are welcome! =)

Tuesday, May 4, 2010

Alice in Wonderland Apron

I had a busy weekend that ended with me and my daughter sick, and at the doctors on Monday.  I meant to post this earlier, but as you, know life happens!  So better late then never!

My daughter wants to have an Alice in Wonderland birthday party this year, and has been asking for me to make her a dress and apron.  Well I got on the web to do a little research and look for some ideas, when I landed on Amy Karol's (Angry Chicken) Tie One On blog.  She is having an Alice in Wonderland apron contest.  I of course had to participate.  I was going to be making one anyway, so I might as well, right?!
When I looked at the deadline, it said May 1st.  I originally wasn't going to make this apron until July, but 24 hrs works too!  So, I stayed up all night and frogged my way through an Alice apron.   I made it out of  a king size eyelet pillowcase and pink bias tape.  I had to use the seam ripper more than I cared for but overall it turned out OK.


There is a  funny ending to this story though.  When I went to send my pictures to Amy, I had to go back to the Tie One On website to get her email address.  The first thing I saw when the page opened, was that the contest had been extended to June 1st!  I laughed so hard!  So much for staying up all night!  It was my own stupid fault for not checking the main blog page for updates.  I only read the page I landed on in my search which said May 1st.

So, for once in my life, I am a month early in entering a contest!  Whoo hoo!

Now I can procrastinate on finishing the matching dress! =)

Tuesday, April 27, 2010

Soccer Mom of The Bearded Child!

I just had to share this.  My little girl has always been kinda full of weird behavioral surprises, but this one takes the cake!  A friend of my Dads likes to give Cora quarters for the vending machine at a restaurant we go to for lunch, and what does my daughter buy with them?...A moustache collection!   The bad part is she insists on wearing them to soccer practice and games.  I told her I thought it would be best to leave them at home, but she was really set on wearing them to soccer.  I figured the other kids would laugh at her and cure this bizarre phase, but my plan backfired.  They all thought she looked cool.  So it looks like I'm the soccer mom of the bearded child! Awesome!

Friday, April 23, 2010

How to Make a Snail Ribbon Hair Clip

ribbon snail hair clip

I saw a little girl wearing one of these in her hair, and thought..."I have to make that!".  I don't work with ribbon very much, but being a crafter, I had plenty of it laying around.  I don't know if I made this right, but I think it turned out well enough to pass on to the crafty community! =)

Here is what you will need to get started-
  • 4 pieces of ribbon. 3 1/2" for the body, 2 1/2" to cover the clip, 1 3/4" for the antenna, and 21" for the shell
  • wooden skewer or dowel rod and clips to make curly korker ribbon
  • hot glue gun
  • scissors
  • lighter (not shown). This is used to seal the ends of the ribbon to prevent fraying
  • snap hair clip


First seal all ends of the ribbons by placing them near the flame of the lighter.  Test this on a scrap piece first to get the hang of it (warning- do not do this with cotton ribbon. It will catch on fire. Only polyester- the silky kind).  The end of the ribbon will melt a little, giving it a nice sealed edge.  Next, we are going to make the korker ribbon for the shell.  Clip one end of the 21" ribbon to the end of the skewer and wrap in around in a spiral, securing it with another clip (as in the photo to the left).  Once your skewer or dowel is wrapped, place it on a cookie sheet or tin foil in a 275 degree oven for 20 minutes. 


While the korker ribbon bakes, we will make the rest of the clip.   The clip I saw the little girl wearing was an alligator clip.  I however didn't have one, so I had to improvise and use a snap clip.  I wanted to cover the front of the clip with ribbon for 2 reasons.  I thought it would look nicer, and I also needed a surface to glue the snail on to.  This is a little finicky, but it serves its purpose well.  I took plenty of pictures to better help explain my poor writing skills! =)
The first thing you want to do is unsnap the clip.  Place a thin bead of glue all around the top part of the clip, just do not put any on the middle part that snaps open.  Quickly put your 2 1/2" piece of ribbon on top of the glue before it sets, and smooth it out as you close the clip.  Open and close the clip after it cools to make sure the center didn't get glued shut.  Next, cut around the clip leaving a tiny bit of overhang.  Being careful not to burn yourself, pass the cut edges near the flame of the lighter (I find it easier to use a candle lighter).  You will see the edge of the ribbon shrink in a bit as it seals.  Do this around the entire clip.  We now have a blank clip all ready for a new snail to live on!


Let's make the snail body.  Take the 3 1/2" piece of ribbon and wind it around like in the picture below, making the tail narrower than the head.  Once you have it the way you like it, place a couple dabs of glue to hold it in place.  Make a slight bend in the body for the snail head, and glue it onto the clip.


What's a snail without antennas?  To make the antennas cut the edges off of the 1 3/4" ribbon and place them on a cookie sheet or aluminum foil.  We are going to run the lighter over them several times, allowing them to melt and shrink.  This will give them some more stability and keep them from becoming a frayed disaster.  Once your antennas are to your liking, place a dab of glue in the snails head.  Put both antennas into the glue and squeeze the head closed.

By this time, your korker ribbon should be done, or close to it.  Once it is done, remove it from the skewer.  The snail shell is made by winding the korker ribbon around in circles like a lollipop.  Start by rolling one end in and gluing it as you go.  Make sure to keep the curl in the ribbon tight.  Run a bead of glue along the edge of the circle you are forming, securing each ring to the next.  When you are done it should look like a ribbon lollipop (a great idea for another clip, right?!).  Place some glue along the snails back and on the clip above it, and glue the shell into place.  You now have a cool snail hair clip that any kid is sure to love!

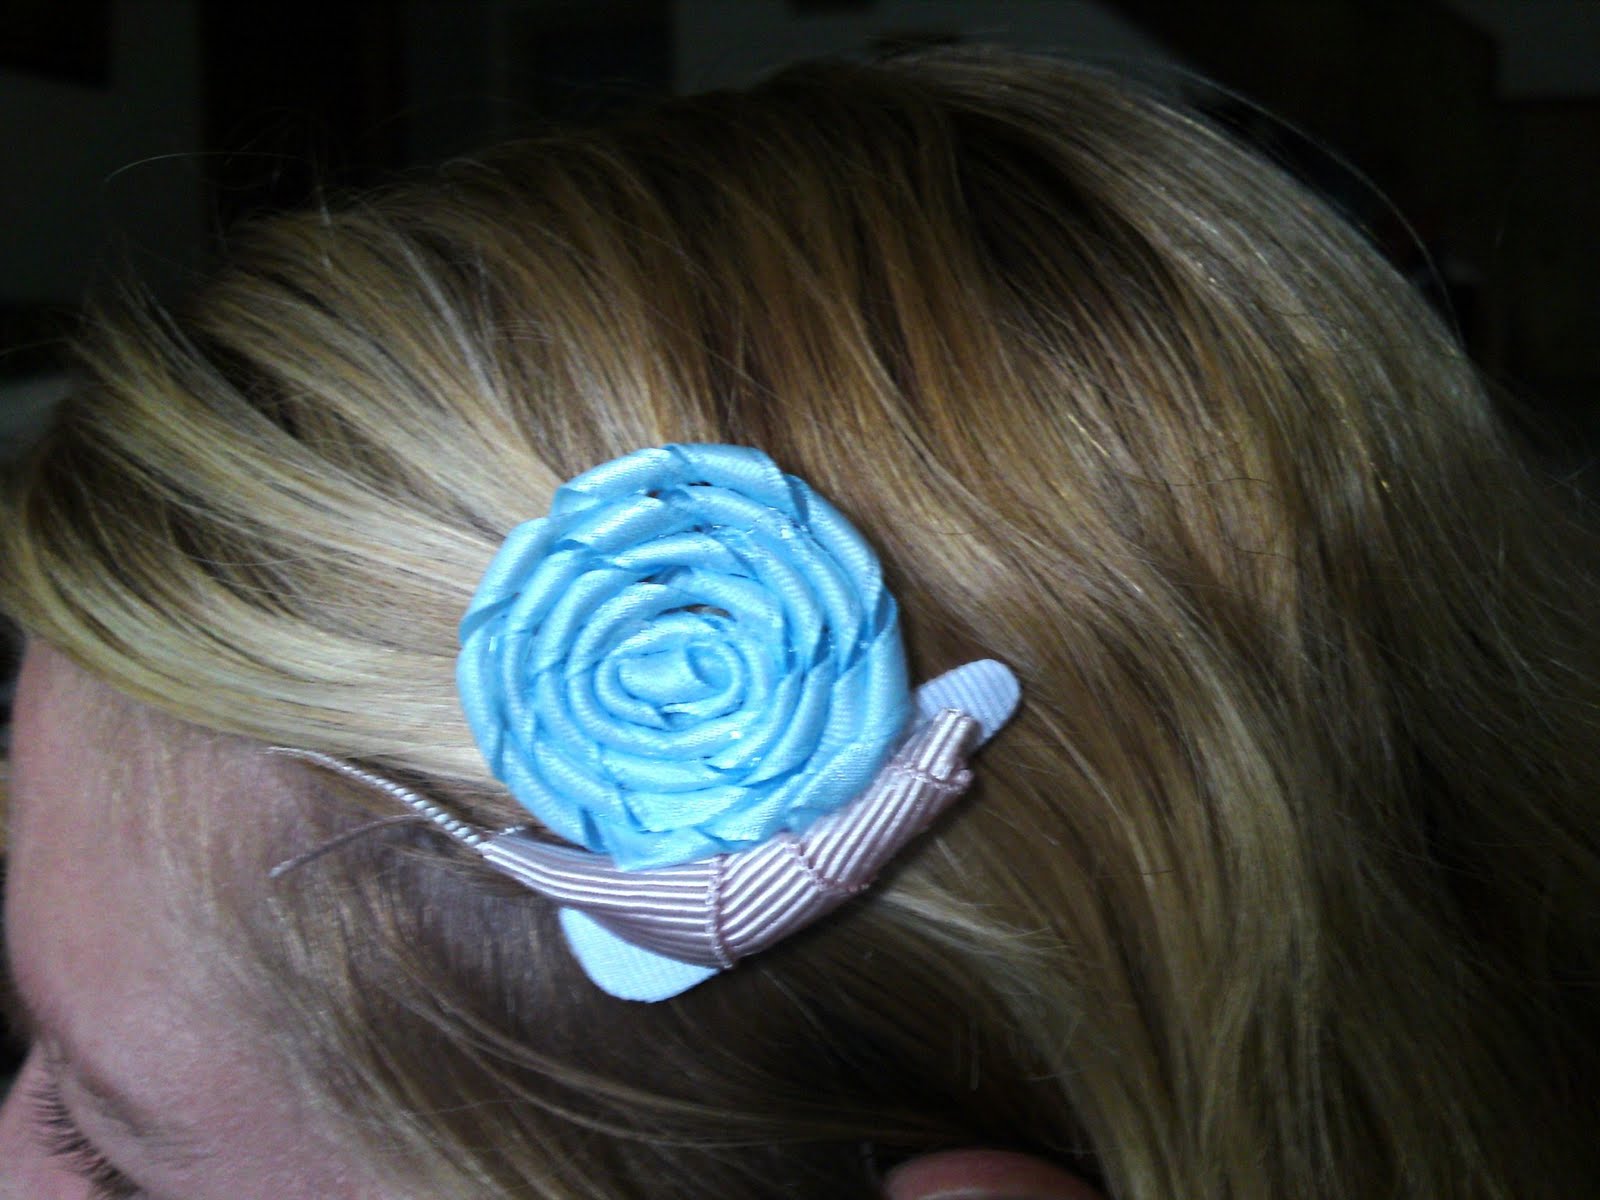
The clips lay nicely against the head.  My sister was kind enough to model  for a photo.  I made 2 snail clips today.  One for my niece and one for my spoiled daughter of course.  They loved them!


Have fun making your own snail clips and be sure to post your pictures of them at the WhimWham Flickr Group!  Questions and comments are welcome as always! =)

Tuesday, April 20, 2010

How to Make Glass Gem Marble Magnets

glass gem marble magnets

I made a quick craft project tonight with Cora.  I had some iridescent glass gems that Cora loved to play with, so today at the store I picked up some clear ones hoping to make some magnets with her tonight.  The clerk however, did not give me all of the bags from my purchase, causing me to have to drive 25 miles back to the store again to claim them.  So after that adventure, I knew we were definitely going to make these magnets tonight!

Here is what we used to make them:
              
  • clear glass gem marbles
  • clear silicone sealant
  • button magnets
  • little pictures or images (from fabric,magazines, stickers, junk mail address labels, photos, etc.)


These were super easy to make and only took us about 10 minutes to make all 10 of them.  Pick out the pictures you want to use and place a glass gem over top of it to make sure it fits.  The gems magnify the image, so just make sure the part you want to show is centered.  The glass gems are all different sizes.  I sort  through them first, to make sure they were big enough to cover the whole magnet.
Once you have your image picked out, use your magnet as a template and draw a circle around the selected image.  Cut out the image and spread a very thin layer of sealant on the magnet to adhere the picture.  Then place a pea sized dot of sealant on the image, and smush a glass gem marble onto it (flat side down of course).  That's it!  Super easy huh?  If you are using stickers or address labels like we did, it's even easier.  Just cut them out, stick them on, and add the sealant and glass gem marble!
Let them dry overnight and give your fridge the ability to hold many more works of art, or useful reminders like this....
glass gem marble magnet

I hope you have as much fun making these as we did!

P.S. Just a word warning.  The new labels on all of the button magnets say they contain lead dust.  Make sure to clean up well!

Saturday, April 17, 2010

Let Your Little Girl Be Alice in Wonderland for a Day!

Cora as Alice in Wonderland
My daughter loves Alice in Wonderland!  She has watched the cartoon so many times and is now obsessed with the made for TV movie of it from the 80's.  The littlest things that have to do with the movie make her so happy.  She found a pocket watch of her papa's and suddenly turned into the white rabbit looking for her gloves and fan.  She seemed to love pretend playing Alice so much, that I thought I would help out her imagination!
I bought a frilly dress at the thrift store for $5 and let her wear it out for a nature walk.  We also had to keep her hair down (which for Cora could be a knotted disaster, but it actually combed through relativity well later on).  So dressed and ready to go, off we went for a nature walk looking for rabbit holes!
 I walked along with her pretend playing that we saw the rabbit and the Cheshire cat.  We kept growing, shrinking, and crawling along.  We barley escaped when we had to run away from the Red Queen!
It was a fun time to spend together, making me reconnect with my own childhood.
Nothing beats a walk through the woods and a little imagination! =)

Cora as Alice in Wonderland


Friday, April 16, 2010

Whim Wham, We Have a Problem!

Sorry I have not wrote a post for awhile.  My hard-drive failed, so I have been out of commission.  It was a new hard-drive too, so it's failure came as kind of a surprise.  Luckily I did not lose a lot of information, and I have finally got a temporary setup going until my new replacement arrives.
A lot has happened here in the last 12 days.  My birthday was on the 12th, and  my daughter took me out to Chuck e Cheese to celebrate!  Wasn't that nice of her?
I also got a pretty cool present.  My long time friend from Korea came to visit me.  He also was kind enough to bring me 5 Japanese craft books too!  One of them is pretty cool.  It is a book of up-cycling and reusing clothing to make kids clothes. I will try to get some pictures of it on here later.
I went to Mitsuwa in Arlington Heights too and got a couple more Japanese craft books yesterday.  I tried to get something a little different this time, instead of the usual sewing patterns.  I chose a paper cutting book and another book that shows how to make fabric containers. (It is in French and Japanese...yeah, two languages I don't understand!)  I can't wait to make something from them!
These technical difficulties are cutting into my precious craft time.  I can't wait until I get it all resolved!
It has been a week of a lot of deep breaths!
I will do my best to catch up on some posts over the weekend! =)

Sunday, April 4, 2010

Mr Fickle Felt Funny Bunny is an Easter Hit!


Happy Easter Everyone!

I don't know about you, but I kind of cut it close to the deadline with my Easter sewing project this year. Yesterday I made my daughter and niece a felt bunny. He's no ordinary bunny though. He is Mr. Fickle funny bunny- a faceless bunny that has an attached pouch/egg full of different eyes, noses, lips, teeth, mustache, flowers. hearts, whiskers... etc! The kids can arrange his face however they like!
I was pleased to see this morning that Mr. Fickle was a huge success!
Here are a couple pictures of some faces they made!

Mr. Fickle felt funny bunny

The little facial pieces and decorations are stored in an attached pocket and Easter egg!
Here is a picture of my little ones Easter basket this morning!
She has played with her bunny for hours! Yeah! =)
Have a great Easter everybody!

Cora's Easter Basket


Thursday, April 1, 2010

April Fools Day Everybody!

Did anyone get a nasty prank pulled on them today? It was surprisingly quiet around here today. That almost seems like an April fools in itself.
I haven't had anyone prank or trick me for years. When I was growing up, my mom would pretty much do the same evil thing every year,(Don't try to deny it either Mom!)and like an idiot, I fell for it more than once! She would tell us it was a snow day, and we be like"woo hoo! no school!". Then she would say "April fools!"
That's just sooo wrong!

Anyway, join me for a group therapy session and post a comment of any April fool's jokes that have ever been played on you!

Tuesday, March 30, 2010

Spinning Wool at the Brookfield Zoo!

Cora and Malea at Brookfield Zoo

My sister and I took the kids to Brookfield Zoo today.  It was a beautiful day for it too!  The kids were having so much fun going from habitat to habitat, and luckily the animals were agreeable to be seen.  Brookfield also has a small petting zoo within it, so of course they wanted to check it out.
Zoo's are really not my cup of tea.  I do love and enjoy looking at all of the animals.  I just feel a little sad about animals being sort of trapped away from their homes, so I normally don't get overly excited about being there.  Today however was different.  As we walked through the petting zoo, I smiled as the kids pet the goats.  I laughed at how cute and huge the pig was, and looked thankfully upon the sheep....but then everything around me faded and became silent as I was drawn like a magnet to the women with the spinning wheel.  What was this?  This has to be the best trip to the zoo ever!  My sister took the kids by the hands, remarking she knows that she has lost me for a while, and told me to meet up with her when my eyes are unglazed.
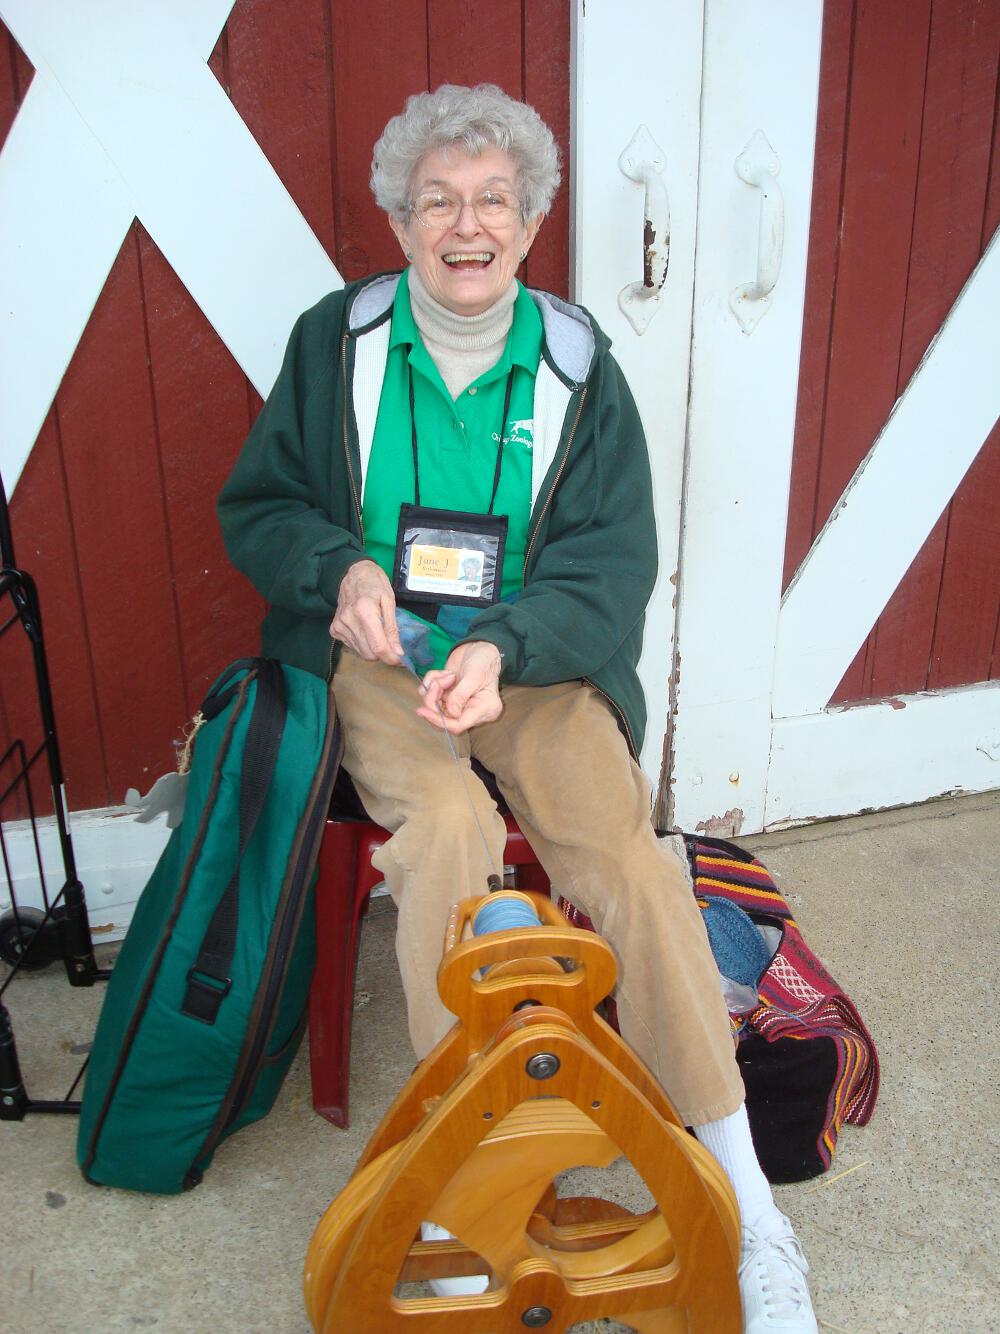
June spinning yarn at Brookfield Zoo
So I had a lovely chat with a women named June, whom has been knitting most of her life.  She was spinning on a portable Ashford Joy spinning wheel, which I watched her pack up in about 1 minutes time.  It was a real treat today, and totally unexpected to run into someone making yarn at the zoo.  June has a lot of experience through her years of carding,spinning and knitting wool.  She happily answered questions as kids crowed all around her (me being the biggest one!☺).  She also gave me some information about an inexpensive spinning wheel that she has come across.  The spinning wheel is made out of PVC.  She said it is not the prettiest wheel on the block, but that it spins like a dream.  The good news is, it is very inexpensive.  I went to the website of Babe's Fiber Garden, and sure enough you can get a spinning wheel for under $200.  So if function over fancy works for you, you can own your own wheel in no time!  I may have to give it a whorl..get it!

Anyway, thanks for chatting with me today June.  I truly enjoyed meeting you.  Keep teaching those kids to love wool!  You just may have inspired someone to spin today! =)
June spinning yarn at Brookfield Zoo
Related Posts with Thumbnails
 
Blogging tips