Welcome to Whim Wham's Craft Blog!

I love to craft, sew, knit, crochet, needle felt...ect. Unfortunately, no one around me shares this passion. So, I am branching out into cyber world, hoping to connect with a few crazy...I mean crafty people like me. Enjoy! :)


Showing posts with label sewing. Show all posts

Thursday, February 24, 2011

Going Green Napkins

flannel reusable napkins


With the dreary winter we have had, it does some good to focus on something green! ☺

I made these eco friendly paper towels back in June, but didn't want to post about them until they have been put to the test of everyday use.  They were very simple to make.  I cut some 8in x 8in squares out of scrap flannel that I had left over from cloth diapers I made forever ago (Don't you love when those fabric prints come back around into something new and different!).  Pre-shrink your fabric before cutting your squares though, so they stay the right size.  I have a serger, so I just did an overlock stitch around the outside edges.  I suppose you could cut a bigger square and hem the edges, or possibly just trim them with pinking shears and have a little fraying going on.  Overall, it was very easy to make quite a few of them in a short amount of time.

flannel paper towelsNow, the answer to the question...How did they hold up to the abuse of a family actually using them?...Great!
I thought these things would look so nasty in about a month, but to my surprise, they remained clean and just slightly pilled.  This picture is after 8 months of use.
hanging plastic storage bin
This is what we do with ours.  We keep the clean ones in a regular napkin holder.  I hung a plastic bin, that I found at Hobby Lobby, on the kitchen cabinet in front of the sink to put them into after use. When it gets full, I just throw them in the wash with a load of towels.
Making this change couldn't have been easier, and it has cut our paper towel use down considerably.  We love the feel of the soft flannel so much better too.  It's better for the earth and the pocketbook!
Give them a try.  You'll be glad you did! :)

Thursday, February 10, 2011

"Stick With Me" - Wool Felt Valentine Monster

wool felt monster
 I wanted to share this pattern of a little felt monster I made last year for Valentines day.  I didn't get my blog started soon enough to share it last year, so I figured I would put it on here now!  He's really simple to make.  I cut mine out of red wool felt...a front and back of the body.  I sewed around it using a whipstitch, leaving a little opening for the fiberfill.  I also did a stab stitch through the arms, securing them between the body front and back. I know that it says to cut 4 pieces for the eyes...and you can, but another thing I did, was put a small piece of pipe cleaner bent like a V up and out of the eye-sockets. I then coiled the remaining pipe cleaner and glued on the felt eyes (you could also use googly eyes).  Once the monster is done, cut 2 pieces of felt  for the heart, whip stitching around it and filling it with fiberfill.  Bring the monster hands forward, either gluing or stitching them to the heart.
You can make this alien/monster happy or sad...or a combo of  both.  I called it "stick with me", but there's no saying it can't be "stuck with you" as well!☺
Like I said, it's quick to make,  fun and a good gift for a boy!
Here's the pattern.
wool felt monster pattern

Feel free to ask any questions or leave comments!
Enjoy! ♥

Tuesday, June 22, 2010

A Prairie Bonnet for My Little Girl ♥

Prairie Bonnet

I made a prairie bonnet for Cora today.  She asked for one this summer to keep the sun out of her eyes.  
I love watching period piece films.  Cora watches them with me sometimes, occasionally asking me to make her something that one of the little girls is wearing.  My poor kid has no idea what year it is in the fashion world.  I know she'll figure it out soon enough, but for now, I am going to enjoy how cute she looks in this!
She also asked me for a petticoat and bloomers for her birthday.  I can't wait to see it all together!

I had no idea how to make a prairie bonnet, so I just measured her head and drew a pattern that I thought would work.  I made this from a recycled bed sheet.  It's a bit snug around her head ear to ear, so I'll have to increase it a bit there.  Otherwise it turned out ok.  I made it long enough to cover her neck in the back, to protect it from the sun.  I may change the brim a little bit too, so it covers the sides of her face better (didn't want to block her peripheral vision completely! =) .  My niece wants one now too, so I'll see how the changes go on the next one. 

Cora's bonnet already saved her from a branch lashing in the face though!  She was pulling crab apples off of the tree as I was taking her picture.  The tree fought back!  I happened to click the photo right then for an action shot.  Straight hit to the bonnet!  Better than the face right?!?!  So, needless to say she's already fond of it!


Tuesday, May 25, 2010

When it Rains it Pours!

"When it rains it pours!" my grandma would always say to me when things weren't going her way.  However, sometimes when it rains and pours, it can be the very cause of nothing going your way!
First I want to apologize for the lack of posts lately and offer an explanation for my absence.  My father owns a historical building that did not weather the recent storms.  A severe wind storm peeled back pieces of the roofing and left a historically huge disaster behind.  We were not aware of the damage until after it rained for days, filling the building up like a bucket.  When I first discovered what had happened, I wanted to cry.  Pieces from the 18 ft ceiling had fallen down, and the beautiful hard wood maple floors buckled up about 1 ft off the ground.  The whole building was basically ruined!
My father is out of town on business.  So for the last 2 weeks, I have been dealing with this disaster and a renovation team that is trying to determine if the building is even going to be salvageable.  It has been heart breaking to watch them tear everything out of there and toss it into dumpsters....100 year old doors, the entire original maple floor, all of the contents that we had in there.  The news just keeps getting worse and it looks like our historical building will soon be history.  I can't even image them knocking it down.  It is the 2nd oldest building in our town, and it has been there forever.  I have spent so much of my life in that building. I grew up dancing in there (yes I used to be a dancer haha!). I opened my first business up with my best friend there too.  Lots of good memories!

wool felt hair clip covers
Anyway, sorry for rambling on.
I have still managed to get some crafting done in between the chaos.  I cut out about 350 wool felt covers for the needle felted hair clips I make on Etsy.  (It was actually kind of therapeutic.  Crafting often can be good therapy!)  I also did some needle felting...nothing helps you distress like stabbing something with a needle a couple thousand times!


handmade baby gift set
I had a baby shower to go to for my cousin this weekend too, so I made her baby girl a matching gift set.  I appliquéd and sewed a onesie dress, two burp clothes, a pacifier clip, and a reversible bonnet.  I made everything the morning of the baby shower and still managed to arrive looking like I've slept and showered recently! =)


So, that's what's been going on with me for the last couple of weeks.  Hopefully, I will have so more free time soon, to put a decent tutorial on here, and catch up on my 870 items I haven't read yet in Google reader!  Wish me luck!

Wednesday, May 12, 2010

Travel Tissue Cover Tutorial

travel tissue cover

Today was the last day of Jam Junction (an after school program my daughter liked going to at our church).  She really liked going and is bummed that it's ending for the year.  So to thank the Pastor and all the volunteers for the fun she has had, I decided to make little "Bless You" travel tissue covers for her to give as gifts.  I am sure there are plenty of tutorials out there on how to make these, but I am going to share my version anyway. =)

I made them with 2 different fabrics- 6" x 7"outer fabric and 6"x 8" lining fabric.  These dimensions will give you a 1/4" border around the opening.  If you want more lining fabric to show, creating a thicker border, cut the lining fabric bigger and the outer fabric smaller.  For example- for a 1/2" border, cut a 6" x 6 1/2" outer and a 6" x 8 1/2" lining.  Another option is to put all of the lining fabric to one end, creating a wide border only on that end (making that the side you use when you overlap the ends). Confused yet???  Maybe some pictures will help!

I made 4 covers with a 1/4" border. (as you will see by the multiple covers in the photos)

First, cut out 1 outer and 1 lining fabric.  With the right sides facing together, sew along the 6" side on both ends with a 1/4" seam allowance (the lining fabric will be kind of bunched up in the middle).  Once you have sewn both ends, turn right side out and iron. (Here is where you can either put a 1/4" border on each side, or 1/2" border all to one side.  I chose to put 1/4" on each side).


The next step is optional, but sure makes the cover look a lot nicer.  It's time to embellish it!  I chose to use decorative stitches on my sewing machine.  I chose a flower pattern with the words "Bless You" (since these are for our church).  I know not everyone has a decorative stitch option, but instead you could sew on some ribbon, ric rac, appliqué, buttons, hand embroider it, or just sew some zigzags!  Anything you want!


Now that your cover is embellished, it is time to finish sewing it together.  Find the center and overlap the borders on that center line (not overlapping more than 1/4").  Make sure to put the side you want to show more of, on the top (for example- I put the "Bless You" side on the top).  Here is where you would also overlap the one sided border on top, if you chose to put all of the lining fabric to one side.
We are going to make a french seam, so we will be sewing it together how the finished cover is going to look.  Sew very close to the edges- about 1/8" seam allowance. Do this on both ends.  Trim and cut any stray threads, then turn the cover inside out (use a chopstick to push the corners out nice ).  We are going to be enclosing our seam to give the cover a nice smooth lining.  Sew another seam (a little over 1/8") enclosing the raw edge of our previous seam, like in th photos below. Do this on both ends.


Turn the cover right side out again and fill with a pack of travel tissue (Our Wal-Mart sells them in the travel sample isle, 3 packs for $1).   Be even more eco friendly and fill it with washable hankies! =)

These travel tissue covers make a great quick gift idea for almost anyone!  I hope you enjoy making them as much as I do!

travel tissue cover

As always all questions and comments are welcome! =)

Tuesday, May 4, 2010

Alice in Wonderland Apron

I had a busy weekend that ended with me and my daughter sick, and at the doctors on Monday.  I meant to post this earlier, but as you, know life happens!  So better late then never!

My daughter wants to have an Alice in Wonderland birthday party this year, and has been asking for me to make her a dress and apron.  Well I got on the web to do a little research and look for some ideas, when I landed on Amy Karol's (Angry Chicken) Tie One On blog.  She is having an Alice in Wonderland apron contest.  I of course had to participate.  I was going to be making one anyway, so I might as well, right?!
When I looked at the deadline, it said May 1st.  I originally wasn't going to make this apron until July, but 24 hrs works too!  So, I stayed up all night and frogged my way through an Alice apron.   I made it out of  a king size eyelet pillowcase and pink bias tape.  I had to use the seam ripper more than I cared for but overall it turned out OK.


There is a  funny ending to this story though.  When I went to send my pictures to Amy, I had to go back to the Tie One On website to get her email address.  The first thing I saw when the page opened, was that the contest had been extended to June 1st!  I laughed so hard!  So much for staying up all night!  It was my own stupid fault for not checking the main blog page for updates.  I only read the page I landed on in my search which said May 1st.

So, for once in my life, I am a month early in entering a contest!  Whoo hoo!

Now I can procrastinate on finishing the matching dress! =)

Friday, April 23, 2010

How to Make a Snail Ribbon Hair Clip

ribbon snail hair clip

I saw a little girl wearing one of these in her hair, and thought..."I have to make that!".  I don't work with ribbon very much, but being a crafter, I had plenty of it laying around.  I don't know if I made this right, but I think it turned out well enough to pass on to the crafty community! =)

Here is what you will need to get started-
  • 4 pieces of ribbon. 3 1/2" for the body, 2 1/2" to cover the clip, 1 3/4" for the antenna, and 21" for the shell
  • wooden skewer or dowel rod and clips to make curly korker ribbon
  • hot glue gun
  • scissors
  • lighter (not shown). This is used to seal the ends of the ribbon to prevent fraying
  • snap hair clip


First seal all ends of the ribbons by placing them near the flame of the lighter.  Test this on a scrap piece first to get the hang of it (warning- do not do this with cotton ribbon. It will catch on fire. Only polyester- the silky kind).  The end of the ribbon will melt a little, giving it a nice sealed edge.  Next, we are going to make the korker ribbon for the shell.  Clip one end of the 21" ribbon to the end of the skewer and wrap in around in a spiral, securing it with another clip (as in the photo to the left).  Once your skewer or dowel is wrapped, place it on a cookie sheet or tin foil in a 275 degree oven for 20 minutes. 


While the korker ribbon bakes, we will make the rest of the clip.   The clip I saw the little girl wearing was an alligator clip.  I however didn't have one, so I had to improvise and use a snap clip.  I wanted to cover the front of the clip with ribbon for 2 reasons.  I thought it would look nicer, and I also needed a surface to glue the snail on to.  This is a little finicky, but it serves its purpose well.  I took plenty of pictures to better help explain my poor writing skills! =)
The first thing you want to do is unsnap the clip.  Place a thin bead of glue all around the top part of the clip, just do not put any on the middle part that snaps open.  Quickly put your 2 1/2" piece of ribbon on top of the glue before it sets, and smooth it out as you close the clip.  Open and close the clip after it cools to make sure the center didn't get glued shut.  Next, cut around the clip leaving a tiny bit of overhang.  Being careful not to burn yourself, pass the cut edges near the flame of the lighter (I find it easier to use a candle lighter).  You will see the edge of the ribbon shrink in a bit as it seals.  Do this around the entire clip.  We now have a blank clip all ready for a new snail to live on!


Let's make the snail body.  Take the 3 1/2" piece of ribbon and wind it around like in the picture below, making the tail narrower than the head.  Once you have it the way you like it, place a couple dabs of glue to hold it in place.  Make a slight bend in the body for the snail head, and glue it onto the clip.


What's a snail without antennas?  To make the antennas cut the edges off of the 1 3/4" ribbon and place them on a cookie sheet or aluminum foil.  We are going to run the lighter over them several times, allowing them to melt and shrink.  This will give them some more stability and keep them from becoming a frayed disaster.  Once your antennas are to your liking, place a dab of glue in the snails head.  Put both antennas into the glue and squeeze the head closed.

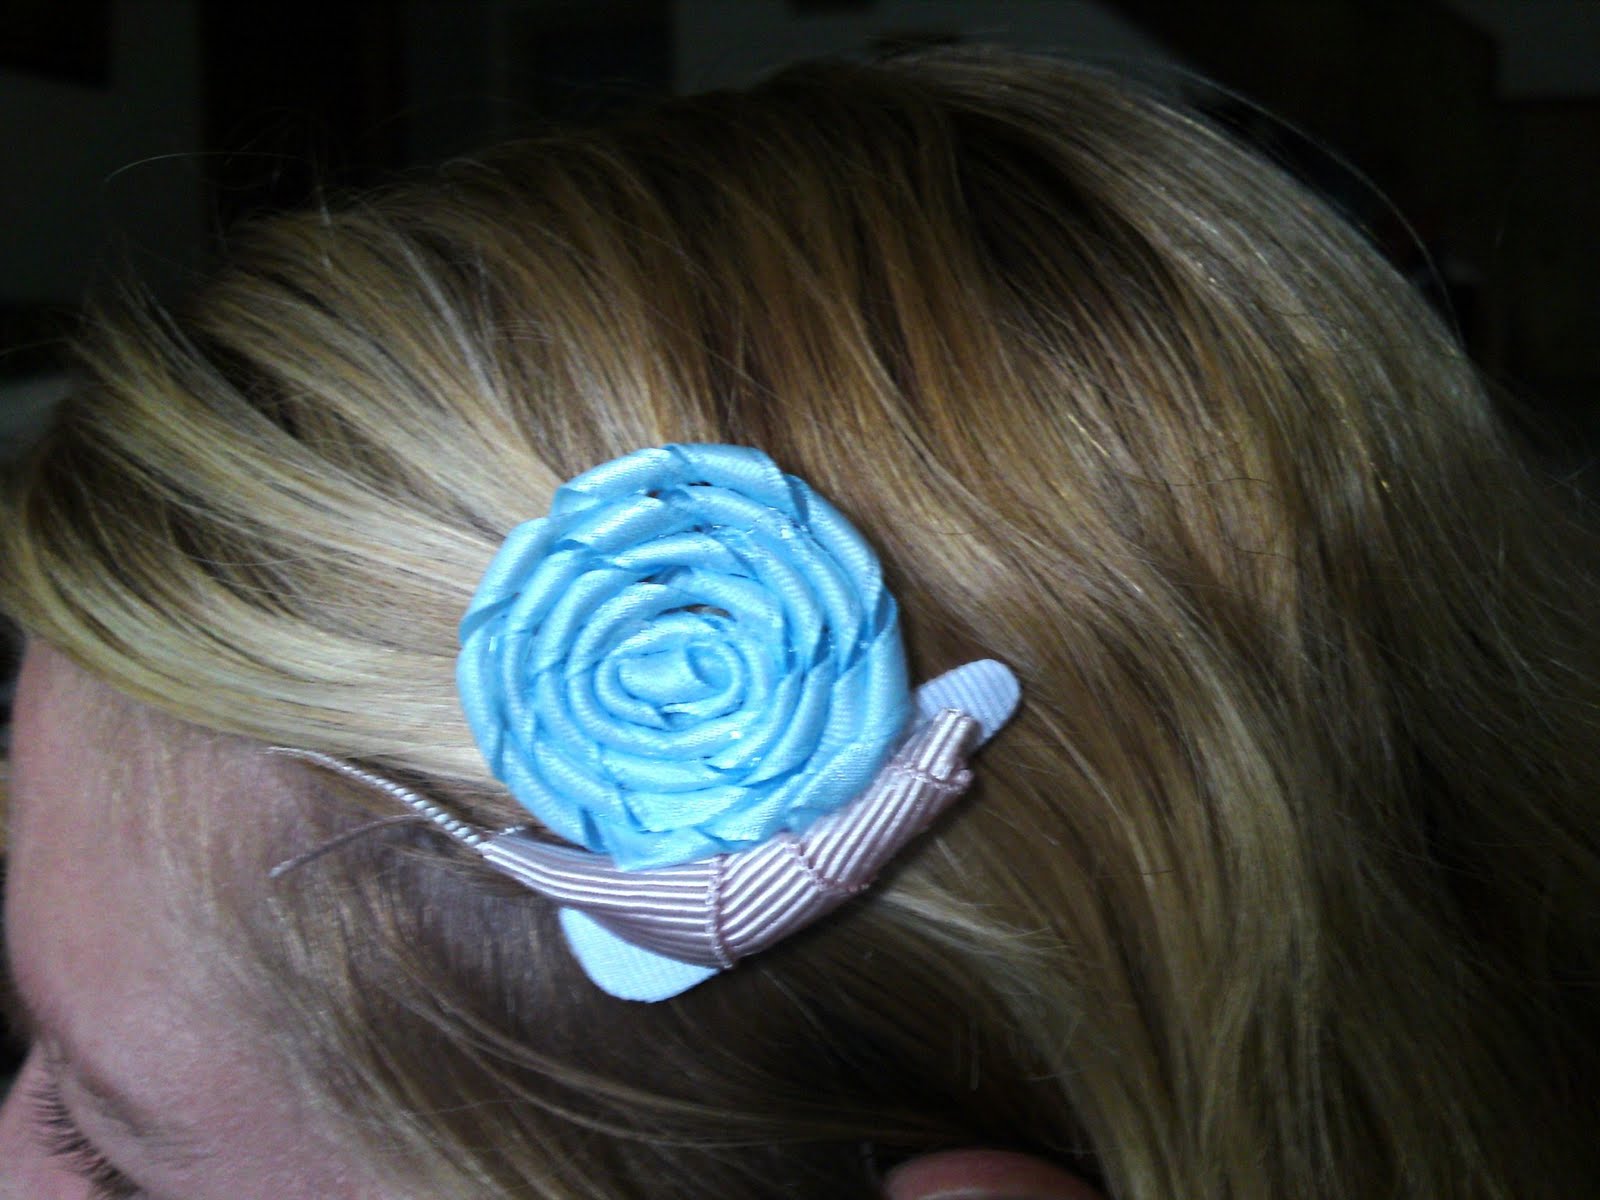
By this time, your korker ribbon should be done, or close to it.  Once it is done, remove it from the skewer.  The snail shell is made by winding the korker ribbon around in circles like a lollipop.  Start by rolling one end in and gluing it as you go.  Make sure to keep the curl in the ribbon tight.  Run a bead of glue along the edge of the circle you are forming, securing each ring to the next.  When you are done it should look like a ribbon lollipop (a great idea for another clip, right?!).  Place some glue along the snails back and on the clip above it, and glue the shell into place.  You now have a cool snail hair clip that any kid is sure to love!

The clips lay nicely against the head.  My sister was kind enough to model  for a photo.  I made 2 snail clips today.  One for my niece and one for my spoiled daughter of course.  They loved them!


Have fun making your own snail clips and be sure to post your pictures of them at the WhimWham Flickr Group!  Questions and comments are welcome as always! =)

Sunday, April 4, 2010

Mr Fickle Felt Funny Bunny is an Easter Hit!


Happy Easter Everyone!

I don't know about you, but I kind of cut it close to the deadline with my Easter sewing project this year. Yesterday I made my daughter and niece a felt bunny. He's no ordinary bunny though. He is Mr. Fickle funny bunny- a faceless bunny that has an attached pouch/egg full of different eyes, noses, lips, teeth, mustache, flowers. hearts, whiskers... etc! The kids can arrange his face however they like!
I was pleased to see this morning that Mr. Fickle was a huge success!
Here are a couple pictures of some faces they made!

Mr. Fickle felt funny bunny

The little facial pieces and decorations are stored in an attached pocket and Easter egg!
Here is a picture of my little ones Easter basket this morning!
She has played with her bunny for hours! Yeah! =)
Have a great Easter everybody!

Cora's Easter Basket


Wednesday, March 24, 2010

I Scream, You Scream, We all Scream for Ice Cream!

dolls holding felt ice cream cones


As promised, I have come up with a new addition to the wool felt play food.  It's getting a little warmer outside and Cora keeps asking for ice cream, so I let her have it. (Sugar free of course!)
Do you want your own felt ice cream cone?  Well, here is what you will need to make one:
  • Wool felt squares (tan for the cone and another color for the ice cream)
  • Matching thread for the cone
  • Red wool for the cherry, or seed beads/embroidery thread for the sprinkles
  • Fiber fill/ poly stuffing
  • Scissors
  • disappearing ink pen or chalk
  • ruler
  • Needle and thread (yes hand sewing is involved!)
  • Sewing machine (cone can also be sewn by hand if you have no machine)
  • Wool Felt Ice Cream Cone Pattern - page1 page2
Let's get started!
First, print and cut out the pattern.  Cut 1 cone piece, 1 scoop circle, and 2 scoop drips (I forgot to show the 2 drips cut in the photo. Sorry!)


Once you have all of the pieces cut, we will get started on making the cone look a little more realistic.  Take your ruler and disappearing ink pen/chalk and mark lines going both directions on the cone.  I chose to start from the edge and mark every 1/2", giving me ten lines.  Do this from each edge for a total of 20 lines.  You can make your lines however far apart you would like them.  I found that 20 lines were not that big of deal to sew by machine, since they are so short.  Oh no, I gave away the next part...we will be sewing along these lines with the matching thread.  Line your sewing machine needle up with your marks and straight stitch on your lines.  I sewed all my lines going one direction first, then all of the lines going the opposite direction next. Try not to pull on the felt while sewing, so it does not distort.  You've made your cone look like a sugar cone, yeah!
Now it's time to make it look like a cone.  Put the right sides of the straight edges together and sew across from top to tip with 1/4" seam allowance.  Turn it right side out.  It should now look like a cone, as in the picture below.

What's a cone without ice cream?  First we are going to make the drip of the scoop.  Lay the 2 drip pieces on top of one another and sew along the edge of the curvy part (do not sew the ends closed).  Sew as close to the edge as you can (about a 1/8 " seam allowance).  Clip any curves that need it and turn inside out.  Now take both ends, opened up flat, and place them right sides together.  This will form a ring.  Sew them together with a 1/4" seam allowance.  Fold back in half and admire your new drip ring!  To attach the ring to the cone, slide it down onto the outside of the cone (matching up the seams), and sew along the inside edge (see photo below).


Now it's time for a scoop of ice cream, and some hand sewing!  I find it easier to do a gather stitch by hand rather than by machine for this next step.  On the big circle piece, do a running stitch along the outside edge.  Double up your thread so it will not break when you cinch everything together.  Leave a tail at the starting and end points so you have a way to pull and tie it all together.  Felt is thick, so just keep moving the fabric all together until it's closed like the second picture (leaving an opening for the stuffing).  Tie the threads in a knot, so it doesn't open back up while stuffing it.  Leave the thread and needle attached.  You will need it to attach to scoop.
Take your fiber fill and stuff the cone and the scoop as full as you can.
The next part is kind of tricky, but you can do it!  Place the scoop on top of the cone, holding it down with your 2 fingers (as in the 4th photo).   Use the same thread you used to cinch the scoop, to attach it to the cone.  Sew the scoop on with a ladder stitch.  Make a stitch right below the stitch line of the drip, then right above into the scoop (click the picture to enlarge it for better viewing).  Stitch like this all along the edge until the entire scoop is attached.

That's it!  You're done!  Now embellish it the way you want.  Make another little circle (like the scoop) to make a cherry, or sew seed beads (or embroidery thread) on for sprinkles.  Just make it age appropriate and safe.  We don't want any little ones choking on their ice cream.
Wool Felt Ice Cream Cone


dolls holding felt ice cream cones


I hope you've enjoyed this tutorial.
Do you want to see more felt play food tutorials?  Let me know what you are interested in seeing.

Please leave any comments or questions below, or contact me via email.

Thursday, March 18, 2010

Mushroom Sweater Slippers

mushroom wool sweater slippers

I made another pair of sweater slippers for Cora.  She gave her bird ones to her cousin, because she said they were too big for her.  I made this pair a little bit smaller...so they should fit her for a week or so right???  That's OK, because mom can just make more and more!  Not going to happen!  I told her no more until she outgrows them.
I made mushroom slippers per her request. The mushrooms themselves are appliquéd on, but I did needle felt the spots.  She asked if I could make her mushroom's smile.  So, I still have to needle felt the smiley faces on them.    
This sweater was the thickest felt I have ever worked with.  When I was sewing on the soles, it was almost an inch thick under the presser foot.  What a pain!  I am glad they are done.  
I wonder what I'll make tomorrow?

Saturday, March 13, 2010

Hand Bound Mini Leather Journal

Hand Bound Leather Journal
I love the rustic look of a hand bound leather journal.  The softness..the smell..ahhh, so good!
Anyway, I bought a scrap bag of leather at the craft store awhile back, and have been wanting to make a little journal with it for some time now.
Well, last night was my chance.  My grandpa gave me an old guillotine paper cutter, so naturally I had to test it out immediately.  I cut  the paper to 5 1/2" by 4 1/4" pieces.  I folded the pieces in half so that they measured  2 3/4" by 4 1/2".  I made 5 signatures, with 8 pieces in each, for a total of 40 pages.  I measured around the signatures and cut a piece of leather to match.  I also cut 4 slits on the spine to weave the thread through.  I poked holes in 4 different places in my signatures to match up with the slits in the leather, and sewed all of the signatures into place.
To find out more information on how to do this, Google sewing spine of book, binding books, hand binding... etc.  I am a severe amateur at this, but would love to learn more. Like I need to start another craft!  Right????

Wednesday, March 10, 2010

Cora's Wool Felt Play Food Collection


wool felt play food
Cora has been asking me to make her some more felt play food lately. Like the little spoiled girl needs anything else, right? It's hard to resist those big blinky eyes though! I usually only make her things for the holidays, but she's been trying to behave extra good lately, so I came up with something to add to her collection.
I'll post more about it when I have the tutorial and pattern to share with everyone!

Saturday, March 6, 2010

♥ Wool Felt Sweater Slipper Sock Tutorial and Pattern ♥

wool felt slipper socks
I have been making wool felt slipper socks for my daughter for the last 5 years.  She and my niece love them, so I wanted to share with everyone how I make them. 
(This tutorial is for personal use only.  I ask that you please do not sell any patterns or sweater slippers that are made from this tutorial.  Thank you! ☺)

Let's get started!

Here is what you will need.
  • a felted (fulled) sweater
  • scissors
  • paper and pencil for making the pattern
  • pattern weights and pins
  • a sewing machine or a needle and thread if sewing by hand
  • a flexible measuring tape and a willing participant to take measurements on
  • scrap wool for an applique (optional)
  • sewable heat-n-bond or similar for ease of attaching applique (also optional)
Here is a tutorial I wrote on making the pattern:
How to Draft the Wool Sweater Slipper Sock Pattern
(Google docs is glichy sometimes. If files are not available, just put a request of what doc you need in the comments or via email, and I will send you a copy☺)


Once you have your pattern made, lay it out on the sweater.  You want to make sure the sweater you have chosen is big enough for all of the pieces, also to figure out the best layout for the least amount of waste.☺  If the sweater is not big enough, it's not a big deal.  You can always mix and match pieces from other sweaters to complete the project.  For example, use different color soles than the rest of the slipper.  This is a fun thing to do even if the sweater you've chosen is the right size.  Mix and match...make your slippers unique!

Be sure to line up the top edge of the ankle cuff with the sweater ribbing so your slippers will have a nice edge.  It will also enable them to stretch well over your heel when putting them on.

Pin or put weights on the pattern pieces and cut them out.  I usually cut through the 2 layers at once so I end up with mirror images of my pattern.  Just be careful that a seam placement or knit pattern on the opposite side does not differ from the side you are cutting on.  I also make sure that the upper piece and sole are not on the ribbing part of the sweater.  Ribbing is usually wavy and it does not felt like the rest of the sweater.

Another option, depending on the thickness of wool, is to make a double soled slipper for extra cushion.  This is a little more difficult to sew.  If you are not really experienced, you may want to skip it on your first pair.  The sweater I choose was kind of thin, so I choose to double up the sole.
You can also hand sew a leather sole on for added protection.  My daughter just starts to wear out the sole of hers before she needs a new size, so I have never done this.  It would be a good idea for feet that have stopped growing though.  I think it would really extend the life of the slippers.

The following picture shows how I placed my pattern pieces and cut them out. (Do you like my excessive pattern weights?  Hey... Those patterns were going nowhere!)


Now that the pieces are all cut out, it is time to embellish them if you want to. (Unless you want to needle felt a design on them. That can be done later if you place a foam block inside them after they are made.)
Related Posts with Thumbnails
 
Blogging tips