

As promised, I have come up with a new addition to the wool felt play food. It's getting a little warmer outside and Cora keeps asking for ice cream, so I let her have it. (Sugar free of course!)
Do you want your own felt ice cream cone? Well, here is what you will need to make one:
- Wool felt squares (tan for the cone and another color for the ice cream)
- Matching thread for the cone
- Red wool for the cherry, or seed beads/embroidery thread for the sprinkles
- Fiber fill/ poly stuffing
- Scissors
- disappearing ink pen or chalk
- ruler
- Needle and thread (yes hand sewing is involved!)
- Sewing machine (cone can also be sewn by hand if you have no machine)
- Wool Felt Ice Cream Cone Pattern - page1 page2
First, print and cut out the pattern. Cut 1 cone piece, 1 scoop circle, and 2 scoop drips (I forgot to show the 2 drips cut in the photo. Sorry!)

Once you have all of the pieces cut, we will get started on making the cone look a little more realistic. Take your ruler and disappearing ink pen/chalk and mark lines going both directions on the cone. I chose to start from the edge and mark every 1/2", giving me ten lines. Do this from each edge for a total of 20 lines. You can make your lines however far apart you would like them. I found that 20 lines were not that big of deal to sew by machine, since they are so short. Oh no, I gave away the next part...we will be sewing along these lines with the matching thread. Line your sewing machine needle up with your marks and straight stitch on your lines. I sewed all my lines going one direction first, then all of the lines going the opposite direction next. Try not to pull on the felt while sewing, so it does not distort. You've made your cone look like a sugar cone, yeah!
Now it's time to make it look like a cone. Put the right sides of the straight edges together and sew across from top to tip with 1/4" seam allowance. Turn it right side out. It should now look like a cone, as in the picture below.


Now it's time for a scoop of ice cream, and some hand sewing! I find it easier to do a gather stitch by hand rather than by machine for this next step. On the big circle piece, do a running stitch along the outside edge. Double up your thread so it will not break when you cinch everything together. Leave a tail at the starting and end points so you have a way to pull and tie it all together. Felt is thick, so just keep moving the fabric all together until it's closed like the second picture (leaving an opening for the stuffing). Tie the threads in a knot, so it doesn't open back up while stuffing it. Leave the thread and needle attached. You will need it to attach to scoop.
Take your fiber fill and stuff the cone and the scoop as full as you can.
The next part is kind of tricky, but you can do it! Place the scoop on top of the cone, holding it down with your 2 fingers (as in the 4th photo). Use the same thread you used to cinch the scoop, to attach it to the cone. Sew the scoop on with a ladder stitch. Make a stitch right below the stitch line of the drip, then right above into the scoop (click the picture to enlarge it for better viewing). Stitch like this all along the edge until the entire scoop is attached.

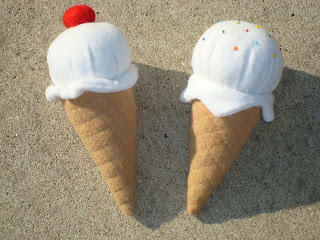
That's it! You're done! Now embellish it the way you want. Make another little circle (like the scoop) to make a cherry, or sew seed beads (or embroidery thread) on for sprinkles. Just make it age appropriate and safe. We don't want any little ones choking on their ice cream.

![]()
Please leave any comments or questions below, or contact me via email.

Once you have all of the pieces cut, we will get started on making the cone look a little more realistic. Take your ruler and disappearing ink pen/chalk and mark lines going both directions on the cone. I chose to start from the edge and mark every 1/2", giving me ten lines. Do this from each edge for a total of 20 lines. You can make your lines however far apart you would like them. I found that 20 lines were not that big of deal to sew by machine, since they are so short. Oh no, I gave away the next part...we will be sewing along these lines with the matching thread. Line your sewing machine needle up with your marks and straight stitch on your lines. I sewed all my lines going one direction first, then all of the lines going the opposite direction next. Try not to pull on the felt while sewing, so it does not distort. You've made your cone look like a sugar cone, yeah!
Now it's time to make it look like a cone. Put the right sides of the straight edges together and sew across from top to tip with 1/4" seam allowance. Turn it right side out. It should now look like a cone, as in the picture below.

What's a cone without ice cream? First we are going to make the drip of the scoop. Lay the 2 drip pieces on top of one another and sew along the edge of the curvy part (do not sew the ends closed). Sew as close to the edge as you can (about a 1/8 " seam allowance). Clip any curves that need it and turn inside out. Now take both ends, opened up flat, and place them right sides together. This will form a ring. Sew them together with a 1/4" seam allowance. Fold back in half and admire your new drip ring! To attach the ring to the cone, slide it down onto the outside of the cone (matching up the seams), and sew along the inside edge (see photo below).

Now it's time for a scoop of ice cream, and some hand sewing! I find it easier to do a gather stitch by hand rather than by machine for this next step. On the big circle piece, do a running stitch along the outside edge. Double up your thread so it will not break when you cinch everything together. Leave a tail at the starting and end points so you have a way to pull and tie it all together. Felt is thick, so just keep moving the fabric all together until it's closed like the second picture (leaving an opening for the stuffing). Tie the threads in a knot, so it doesn't open back up while stuffing it. Leave the thread and needle attached. You will need it to attach to scoop.
Take your fiber fill and stuff the cone and the scoop as full as you can.
The next part is kind of tricky, but you can do it! Place the scoop on top of the cone, holding it down with your 2 fingers (as in the 4th photo). Use the same thread you used to cinch the scoop, to attach it to the cone. Sew the scoop on with a ladder stitch. Make a stitch right below the stitch line of the drip, then right above into the scoop (click the picture to enlarge it for better viewing). Stitch like this all along the edge until the entire scoop is attached.

That's it! You're done! Now embellish it the way you want. Make another little circle (like the scoop) to make a cherry, or sew seed beads (or embroidery thread) on for sprinkles. Just make it age appropriate and safe. We don't want any little ones choking on their ice cream.


I hope you've enjoyed this tutorial.
Do you want to see more felt play food tutorials? Let me know what you are interested in seeing.
Please leave any comments or questions below, or contact me via email.


Thank you for your tutorial! I'm doing some for the kids for Christmas. You're a saver, I didn't know how to make the pattern!
ReplyDeleteGlad it helped! I hope your kids enjoy their ice cream! :)
ReplyDeleteI used the patterns to make christmas gifts and needed to re print it to use again but I cant get it to print can you help me I really want to use this to make my daughters birthday presents
ReplyDeleteThank you
If you give me an email address, I would be more than happy to send you the pdf files of the pattern. If it's just a printer issue, the only help I can offer is to give you the dimensions, so you can draw your own pattern. The cone is 1/4 of a circle with a 10 1/2 inch diameter and the scoop is a circle with a 6 1/2 inch diameter. Hope this helps! ☺
ReplyDeleteI love this pattern! I´ve made my first ice creams and they certainly won´t be my last ones! Thanks for a fabulous tutorial and pattern. I also blogged the ice creams i made if you want to take a peek. :)
ReplyDeleteSo very cute! I will more than likely make these for Christmas Ornaments and link to you for my Candy Land themed Christmas tree. It will be a month or so before I post though. Great tutorial!
ReplyDeleteThese are awesome! I've made ice creams before but I love the drips and made these this time around. Thanks for the pattern!
ReplyDeleteNo problem. Glad the pattern is getting used. :-)
Delete