Welcome to Whim Wham's Craft Blog!

I love to craft, sew, knit, crochet, needle felt...ect. Unfortunately, no one around me shares this passion. So, I am branching out into cyber world, hoping to connect with a few crazy...I mean crafty people like me. Enjoy! :)


Tuesday, May 25, 2010

When it Rains it Pours!

"When it rains it pours!" my grandma would always say to me when things weren't going her way.  However, sometimes when it rains and pours, it can be the very cause of nothing going your way!
First I want to apologize for the lack of posts lately and offer an explanation for my absence.  My father owns a historical building that did not weather the recent storms.  A severe wind storm peeled back pieces of the roofing and left a historically huge disaster behind.  We were not aware of the damage until after it rained for days, filling the building up like a bucket.  When I first discovered what had happened, I wanted to cry.  Pieces from the 18 ft ceiling had fallen down, and the beautiful hard wood maple floors buckled up about 1 ft off the ground.  The whole building was basically ruined!
My father is out of town on business.  So for the last 2 weeks, I have been dealing with this disaster and a renovation team that is trying to determine if the building is even going to be salvageable.  It has been heart breaking to watch them tear everything out of there and toss it into dumpsters....100 year old doors, the entire original maple floor, all of the contents that we had in there.  The news just keeps getting worse and it looks like our historical building will soon be history.  I can't even image them knocking it down.  It is the 2nd oldest building in our town, and it has been there forever.  I have spent so much of my life in that building. I grew up dancing in there (yes I used to be a dancer haha!). I opened my first business up with my best friend there too.  Lots of good memories!

wool felt hair clip covers
Anyway, sorry for rambling on.
I have still managed to get some crafting done in between the chaos.  I cut out about 350 wool felt covers for the needle felted hair clips I make on Etsy.  (It was actually kind of therapeutic.  Crafting often can be good therapy!)  I also did some needle felting...nothing helps you distress like stabbing something with a needle a couple thousand times!


handmade baby gift set
I had a baby shower to go to for my cousin this weekend too, so I made her baby girl a matching gift set.  I appliquéd and sewed a onesie dress, two burp clothes, a pacifier clip, and a reversible bonnet.  I made everything the morning of the baby shower and still managed to arrive looking like I've slept and showered recently! =)


So, that's what's been going on with me for the last couple of weeks.  Hopefully, I will have so more free time soon, to put a decent tutorial on here, and catch up on my 870 items I haven't read yet in Google reader!  Wish me luck!

Wednesday, May 12, 2010

Travel Tissue Cover Tutorial

travel tissue cover

Today was the last day of Jam Junction (an after school program my daughter liked going to at our church).  She really liked going and is bummed that it's ending for the year.  So to thank the Pastor and all the volunteers for the fun she has had, I decided to make little "Bless You" travel tissue covers for her to give as gifts.  I am sure there are plenty of tutorials out there on how to make these, but I am going to share my version anyway. =)

I made them with 2 different fabrics- 6" x 7"outer fabric and 6"x 8" lining fabric.  These dimensions will give you a 1/4" border around the opening.  If you want more lining fabric to show, creating a thicker border, cut the lining fabric bigger and the outer fabric smaller.  For example- for a 1/2" border, cut a 6" x 6 1/2" outer and a 6" x 8 1/2" lining.  Another option is to put all of the lining fabric to one end, creating a wide border only on that end (making that the side you use when you overlap the ends). Confused yet???  Maybe some pictures will help!

I made 4 covers with a 1/4" border. (as you will see by the multiple covers in the photos)

First, cut out 1 outer and 1 lining fabric.  With the right sides facing together, sew along the 6" side on both ends with a 1/4" seam allowance (the lining fabric will be kind of bunched up in the middle).  Once you have sewn both ends, turn right side out and iron. (Here is where you can either put a 1/4" border on each side, or 1/2" border all to one side.  I chose to put 1/4" on each side).


The next step is optional, but sure makes the cover look a lot nicer.  It's time to embellish it!  I chose to use decorative stitches on my sewing machine.  I chose a flower pattern with the words "Bless You" (since these are for our church).  I know not everyone has a decorative stitch option, but instead you could sew on some ribbon, ric rac, appliqué, buttons, hand embroider it, or just sew some zigzags!  Anything you want!


Now that your cover is embellished, it is time to finish sewing it together.  Find the center and overlap the borders on that center line (not overlapping more than 1/4").  Make sure to put the side you want to show more of, on the top (for example- I put the "Bless You" side on the top).  Here is where you would also overlap the one sided border on top, if you chose to put all of the lining fabric to one side.
We are going to make a french seam, so we will be sewing it together how the finished cover is going to look.  Sew very close to the edges- about 1/8" seam allowance. Do this on both ends.  Trim and cut any stray threads, then turn the cover inside out (use a chopstick to push the corners out nice ).  We are going to be enclosing our seam to give the cover a nice smooth lining.  Sew another seam (a little over 1/8") enclosing the raw edge of our previous seam, like in th photos below. Do this on both ends.


Turn the cover right side out again and fill with a pack of travel tissue (Our Wal-Mart sells them in the travel sample isle, 3 packs for $1).   Be even more eco friendly and fill it with washable hankies! =)

These travel tissue covers make a great quick gift idea for almost anyone!  I hope you enjoy making them as much as I do!

travel tissue cover

As always all questions and comments are welcome! =)

Tuesday, May 4, 2010

Alice in Wonderland Apron

I had a busy weekend that ended with me and my daughter sick, and at the doctors on Monday.  I meant to post this earlier, but as you, know life happens!  So better late then never!

My daughter wants to have an Alice in Wonderland birthday party this year, and has been asking for me to make her a dress and apron.  Well I got on the web to do a little research and look for some ideas, when I landed on Amy Karol's (Angry Chicken) Tie One On blog.  She is having an Alice in Wonderland apron contest.  I of course had to participate.  I was going to be making one anyway, so I might as well, right?!
When I looked at the deadline, it said May 1st.  I originally wasn't going to make this apron until July, but 24 hrs works too!  So, I stayed up all night and frogged my way through an Alice apron.   I made it out of  a king size eyelet pillowcase and pink bias tape.  I had to use the seam ripper more than I cared for but overall it turned out OK.


There is a  funny ending to this story though.  When I went to send my pictures to Amy, I had to go back to the Tie One On website to get her email address.  The first thing I saw when the page opened, was that the contest had been extended to June 1st!  I laughed so hard!  So much for staying up all night!  It was my own stupid fault for not checking the main blog page for updates.  I only read the page I landed on in my search which said May 1st.

So, for once in my life, I am a month early in entering a contest!  Whoo hoo!

Now I can procrastinate on finishing the matching dress! =)

Tuesday, April 27, 2010

Soccer Mom of The Bearded Child!

I just had to share this.  My little girl has always been kinda full of weird behavioral surprises, but this one takes the cake!  A friend of my Dads likes to give Cora quarters for the vending machine at a restaurant we go to for lunch, and what does my daughter buy with them?...A moustache collection!   The bad part is she insists on wearing them to soccer practice and games.  I told her I thought it would be best to leave them at home, but she was really set on wearing them to soccer.  I figured the other kids would laugh at her and cure this bizarre phase, but my plan backfired.  They all thought she looked cool.  So it looks like I'm the soccer mom of the bearded child! Awesome!

Friday, April 23, 2010

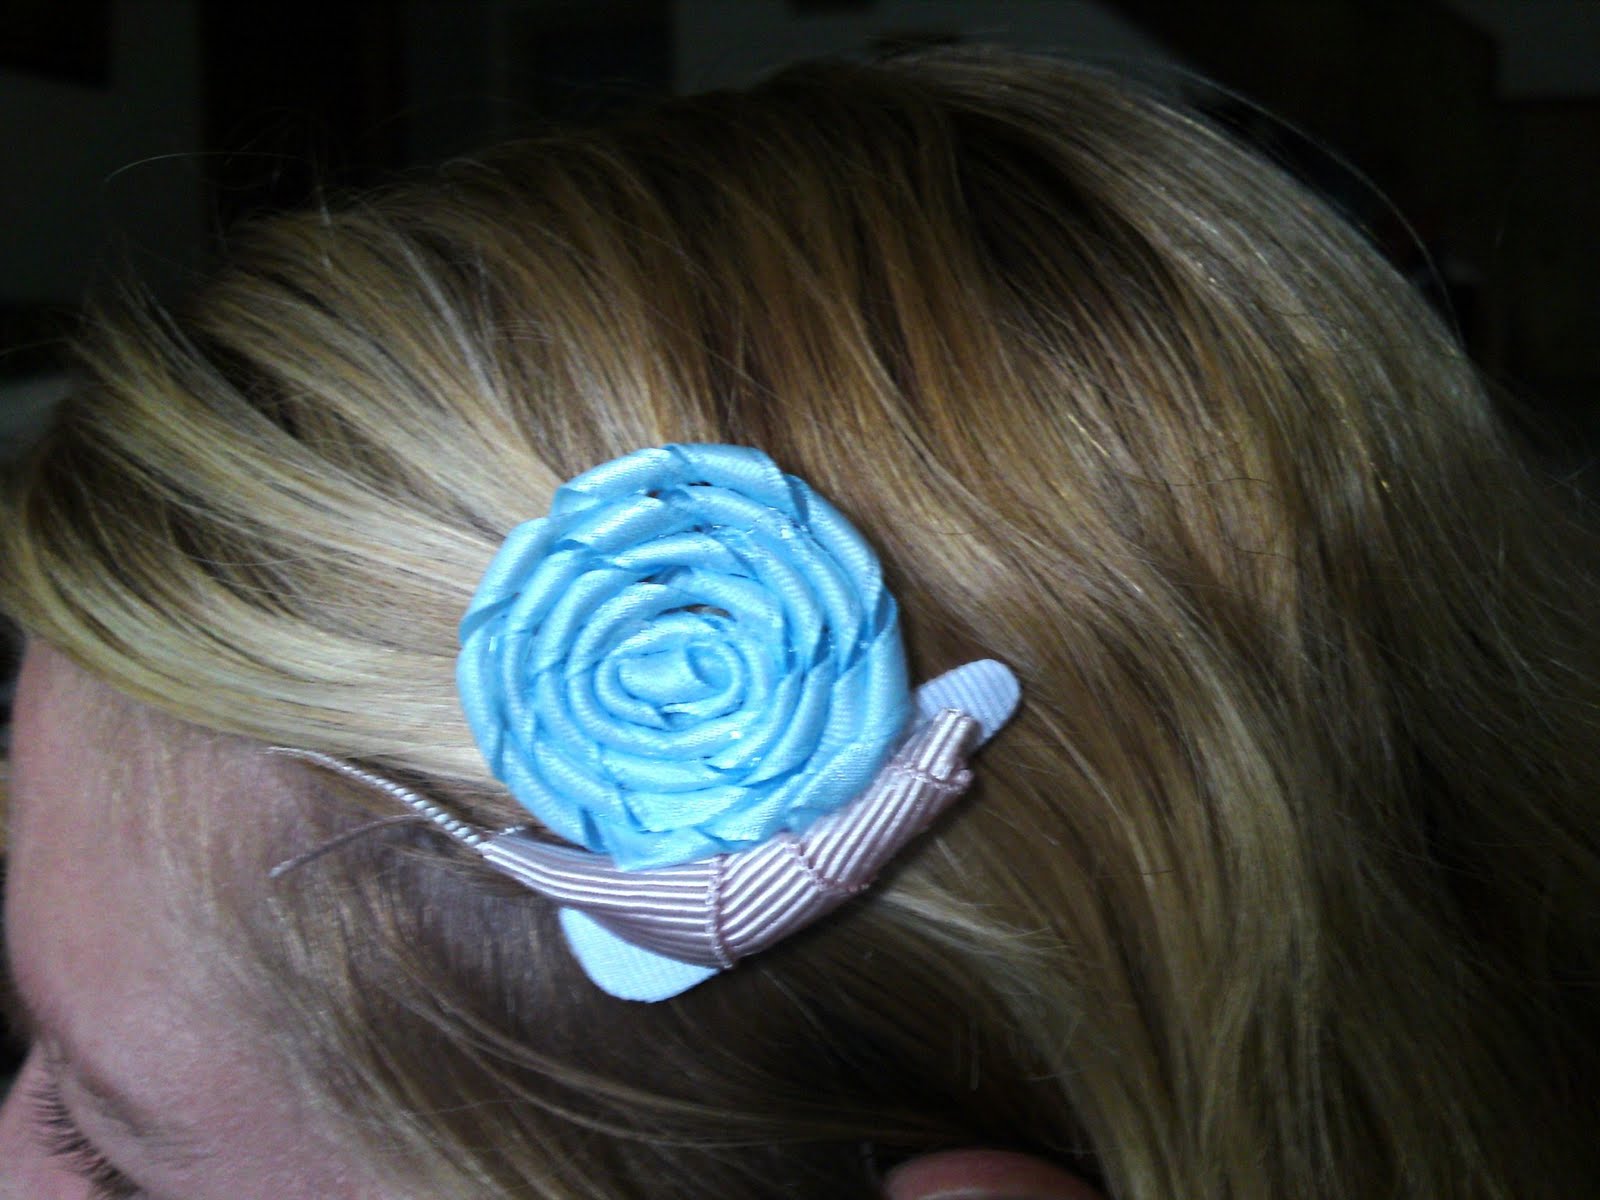
How to Make a Snail Ribbon Hair Clip

ribbon snail hair clip

I saw a little girl wearing one of these in her hair, and thought..."I have to make that!".  I don't work with ribbon very much, but being a crafter, I had plenty of it laying around.  I don't know if I made this right, but I think it turned out well enough to pass on to the crafty community! =)

Here is what you will need to get started-
  • 4 pieces of ribbon. 3 1/2" for the body, 2 1/2" to cover the clip, 1 3/4" for the antenna, and 21" for the shell
  • wooden skewer or dowel rod and clips to make curly korker ribbon
  • hot glue gun
  • scissors
  • lighter (not shown). This is used to seal the ends of the ribbon to prevent fraying
  • snap hair clip


First seal all ends of the ribbons by placing them near the flame of the lighter.  Test this on a scrap piece first to get the hang of it (warning- do not do this with cotton ribbon. It will catch on fire. Only polyester- the silky kind).  The end of the ribbon will melt a little, giving it a nice sealed edge.  Next, we are going to make the korker ribbon for the shell.  Clip one end of the 21" ribbon to the end of the skewer and wrap in around in a spiral, securing it with another clip (as in the photo to the left).  Once your skewer or dowel is wrapped, place it on a cookie sheet or tin foil in a 275 degree oven for 20 minutes. 


While the korker ribbon bakes, we will make the rest of the clip.   The clip I saw the little girl wearing was an alligator clip.  I however didn't have one, so I had to improvise and use a snap clip.  I wanted to cover the front of the clip with ribbon for 2 reasons.  I thought it would look nicer, and I also needed a surface to glue the snail on to.  This is a little finicky, but it serves its purpose well.  I took plenty of pictures to better help explain my poor writing skills! =)
The first thing you want to do is unsnap the clip.  Place a thin bead of glue all around the top part of the clip, just do not put any on the middle part that snaps open.  Quickly put your 2 1/2" piece of ribbon on top of the glue before it sets, and smooth it out as you close the clip.  Open and close the clip after it cools to make sure the center didn't get glued shut.  Next, cut around the clip leaving a tiny bit of overhang.  Being careful not to burn yourself, pass the cut edges near the flame of the lighter (I find it easier to use a candle lighter).  You will see the edge of the ribbon shrink in a bit as it seals.  Do this around the entire clip.  We now have a blank clip all ready for a new snail to live on!


Let's make the snail body.  Take the 3 1/2" piece of ribbon and wind it around like in the picture below, making the tail narrower than the head.  Once you have it the way you like it, place a couple dabs of glue to hold it in place.  Make a slight bend in the body for the snail head, and glue it onto the clip.


What's a snail without antennas?  To make the antennas cut the edges off of the 1 3/4" ribbon and place them on a cookie sheet or aluminum foil.  We are going to run the lighter over them several times, allowing them to melt and shrink.  This will give them some more stability and keep them from becoming a frayed disaster.  Once your antennas are to your liking, place a dab of glue in the snails head.  Put both antennas into the glue and squeeze the head closed.

By this time, your korker ribbon should be done, or close to it.  Once it is done, remove it from the skewer.  The snail shell is made by winding the korker ribbon around in circles like a lollipop.  Start by rolling one end in and gluing it as you go.  Make sure to keep the curl in the ribbon tight.  Run a bead of glue along the edge of the circle you are forming, securing each ring to the next.  When you are done it should look like a ribbon lollipop (a great idea for another clip, right?!).  Place some glue along the snails back and on the clip above it, and glue the shell into place.  You now have a cool snail hair clip that any kid is sure to love!

The clips lay nicely against the head.  My sister was kind enough to model  for a photo.  I made 2 snail clips today.  One for my niece and one for my spoiled daughter of course.  They loved them!


Have fun making your own snail clips and be sure to post your pictures of them at the WhimWham Flickr Group!  Questions and comments are welcome as always! =)

Tuesday, April 20, 2010

How to Make Glass Gem Marble Magnets

glass gem marble magnets

I made a quick craft project tonight with Cora.  I had some iridescent glass gems that Cora loved to play with, so today at the store I picked up some clear ones hoping to make some magnets with her tonight.  The clerk however, did not give me all of the bags from my purchase, causing me to have to drive 25 miles back to the store again to claim them.  So after that adventure, I knew we were definitely going to make these magnets tonight!

Here is what we used to make them:
              
  • clear glass gem marbles
  • clear silicone sealant
  • button magnets
  • little pictures or images (from fabric,magazines, stickers, junk mail address labels, photos, etc.)


These were super easy to make and only took us about 10 minutes to make all 10 of them.  Pick out the pictures you want to use and place a glass gem over top of it to make sure it fits.  The gems magnify the image, so just make sure the part you want to show is centered.  The glass gems are all different sizes.  I sort  through them first, to make sure they were big enough to cover the whole magnet.
Once you have your image picked out, use your magnet as a template and draw a circle around the selected image.  Cut out the image and spread a very thin layer of sealant on the magnet to adhere the picture.  Then place a pea sized dot of sealant on the image, and smush a glass gem marble onto it (flat side down of course).  That's it!  Super easy huh?  If you are using stickers or address labels like we did, it's even easier.  Just cut them out, stick them on, and add the sealant and glass gem marble!
Let them dry overnight and give your fridge the ability to hold many more works of art, or useful reminders like this....
glass gem marble magnet

I hope you have as much fun making these as we did!

P.S. Just a word warning.  The new labels on all of the button magnets say they contain lead dust.  Make sure to clean up well!

Saturday, April 17, 2010

Let Your Little Girl Be Alice in Wonderland for a Day!

Cora as Alice in Wonderland
My daughter loves Alice in Wonderland!  She has watched the cartoon so many times and is now obsessed with the made for TV movie of it from the 80's.  The littlest things that have to do with the movie make her so happy.  She found a pocket watch of her papa's and suddenly turned into the white rabbit looking for her gloves and fan.  She seemed to love pretend playing Alice so much, that I thought I would help out her imagination!
I bought a frilly dress at the thrift store for $5 and let her wear it out for a nature walk.  We also had to keep her hair down (which for Cora could be a knotted disaster, but it actually combed through relativity well later on).  So dressed and ready to go, off we went for a nature walk looking for rabbit holes!
 I walked along with her pretend playing that we saw the rabbit and the Cheshire cat.  We kept growing, shrinking, and crawling along.  We barley escaped when we had to run away from the Red Queen!
It was a fun time to spend together, making me reconnect with my own childhood.
Nothing beats a walk through the woods and a little imagination! =)

Cora as Alice in Wonderland


Related Posts with Thumbnails
 
Blogging tips